Free Backyard Garden
Shed Materials List
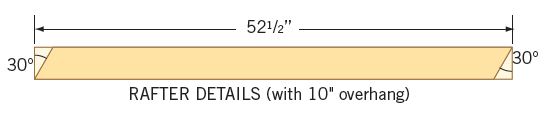
14 rafters, 1 1/2
x 3 1/2” x 521⁄2”
12 rafter supports, 1 1/2” x 2 1/2” x 8 1/2”
8 rafter blocking boards, 1 1/2” x 5 1/2” x 22
1/2”*
10 deck blocks, precast concrete, for 4-by-4
posts
As needed floor posts, 3 1/2” x 3 1/2” x 12”*
As needed floor frame spacers, 1 1/2” x 3 1/2” x
length*
2 long floor edge boards, pressure-treated, 1
1/2” x 5 1/2” x 96”
4 floor joists, pressure-treated, 1 1/2” x 5
1/2” x 69”
11⁄2 sheets pressure-treated floor decking, 5/8”
x 48” x 96”
18 wall studs, 1 1/2” x 3 1/2” x 92 1/2”
6 long bottom/top plates, 1 1/2” x 3 1/2” x
96”**
6 short bottom/top plates, 1 1/2” x 3 1/2” x
65”**
1 door lintel, 3 1/2” x width as needed x length
as needed
2 window studs, 1 1/2” x 3 1/2” x length as
needed
2 top/bottom window frames, 1 1/2” x 3 1/2” x
length as needed
6 or 7 sheets*** wall sheathing (plywood or OSB),
7/16” to 1/2” x 48” x 96”
4 1/2sheets roof sheathing (plywood or OSB),
7/16” to 1/2” x 48” x 96”
Metal rafter hardware
Note:
All materials should be construction-grade lumber
unless otherwise noted. Dimensions are actual — for
example, 1 1/2 inches x 3 1/2 inches are the actual
dimensions of a 2-by-4. Go to your local
Lowe's, back up the truck and go!
*Cut to
length as needed
**Cut upper top plates to overlap corners
***Depending on the size of door and window you
select
Build the Shed Floor
The best spot for a
shed is level, well-drained ground close to where
you work in your garden or backyard. The location
doesn’t need to be perfectly flat, nothing is
perfect; the foundation design shown in the shed
plans allows for adjustments to make the floor
level. Small sheds require only a top-of-soil
foundation, even in locations with freezing winter
temperatures. Precast concrete deck blocks
work perfectly for this. Don't assume you need
or don't need a foundation for your shed, though.
When in doubt, consult a pro.
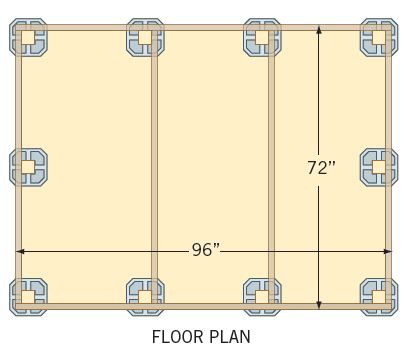
To eliminate the need
for any kind of floor beams for your shed, you’ll
need a deck block at each corner, with two more
blocks equally spaced along the 8-foot sides and one
in the center of each 6-foot side. If you expect to
store particularly heavy items inside your garden
shed, consider installing three deck blocks between
each corner on the 8-foot walls, instead of two.
Deck blocks include a
central pocket sized to fit the standard 4-by-4
vertical posts that typically hold up a deck. In the
case of these shed plans, pressure-treated 4-by-4s
function in a similar way, but in short lengths —
just enough to compensate for any variation in the
shape of the ground (see the plans).
Start by setting deck
blocks on the ground, positioned as shown in the
shed plans diagrams below. While the area doesn’t
have to be perfectly level, you should make the
ground roughly level where each block will rest.
Temporarily place some straight 2-by-6 lumber on
edge in the top grooves of the blocks to orient the
blocks in a straight line. Arrange two rows of four
blocks parallel to each other to form both long
walls, then measure diagonally across the outside
corners to determine how square the arrangement is.
If the two long walls are parallel, and diagonal
measurements taken across corners are equal, then
each corner is guaranteed to be 90 degrees. Finish
up by placing one deck block in the middle of each
6-foot wall after you have aligned and squared the
8-foot walls.
Remove the 2-by-6
lumber guides, then put a 12-inch length of 4-by-4
lumber into each deck block, positioned vertically
in the central recess. These 4-by-4s will be
slightly too long right now, but that’s exactly what
you want.
The 2-by-6s that
form the outer perimeter of the floor frame rest
on the outside top edge of the deck blocks,
tight to the outer faces of the 4-by-4 posts.
Use a 4-foot level and an 8-foot 2-by-6 to
determine the highest deck block in the group,
then use this as your starting point for
installing the floor frame of the shed. Use a
single galvanized 3 1⁄2-inch deck screw to lock
the 2-by-6 to the 4-by-4 on the highest deck
block, then raise the other end of the 2-by-6 so
it’s level before locking the other end of the
2-by-6 to its 4-by-4. The 2-by-6 won’t rest on
all the blocks, but should rest on at least one.
Continue working all around the floor frame of
the shed in this manner until all perimeter
2-by-6s are in the same level plane. Trim all
excess 4-by-4s flush with the top of the 2-by-6s
using a chain saw or reciprocating saw, then add
2-by-6 floor joists running between the two
8-foot walls. Make sure each joist fits tightly
within the outer edges of the floor frame, and
then fasten the joists to the side of the
4-by-4s with screws.
Complete the floor
frame of the shed by driving three 3 1⁄2-inch
deck screws per joint, then custom-cut spacers
out of 1 1⁄2-inch-thick construction lumber to
fill the gap between the underside of the
2-by-6s and the top of the deck blocks. You
can’t rely on screws alone to hold up the floor
frame in the long term. Finish up by installing
a pressure-treated, five-eighths-inch-thick
plywood sub floor on top of the floor frame,
secured with 2 1⁄2-inch deck screws driven every
6 to 8 inches.
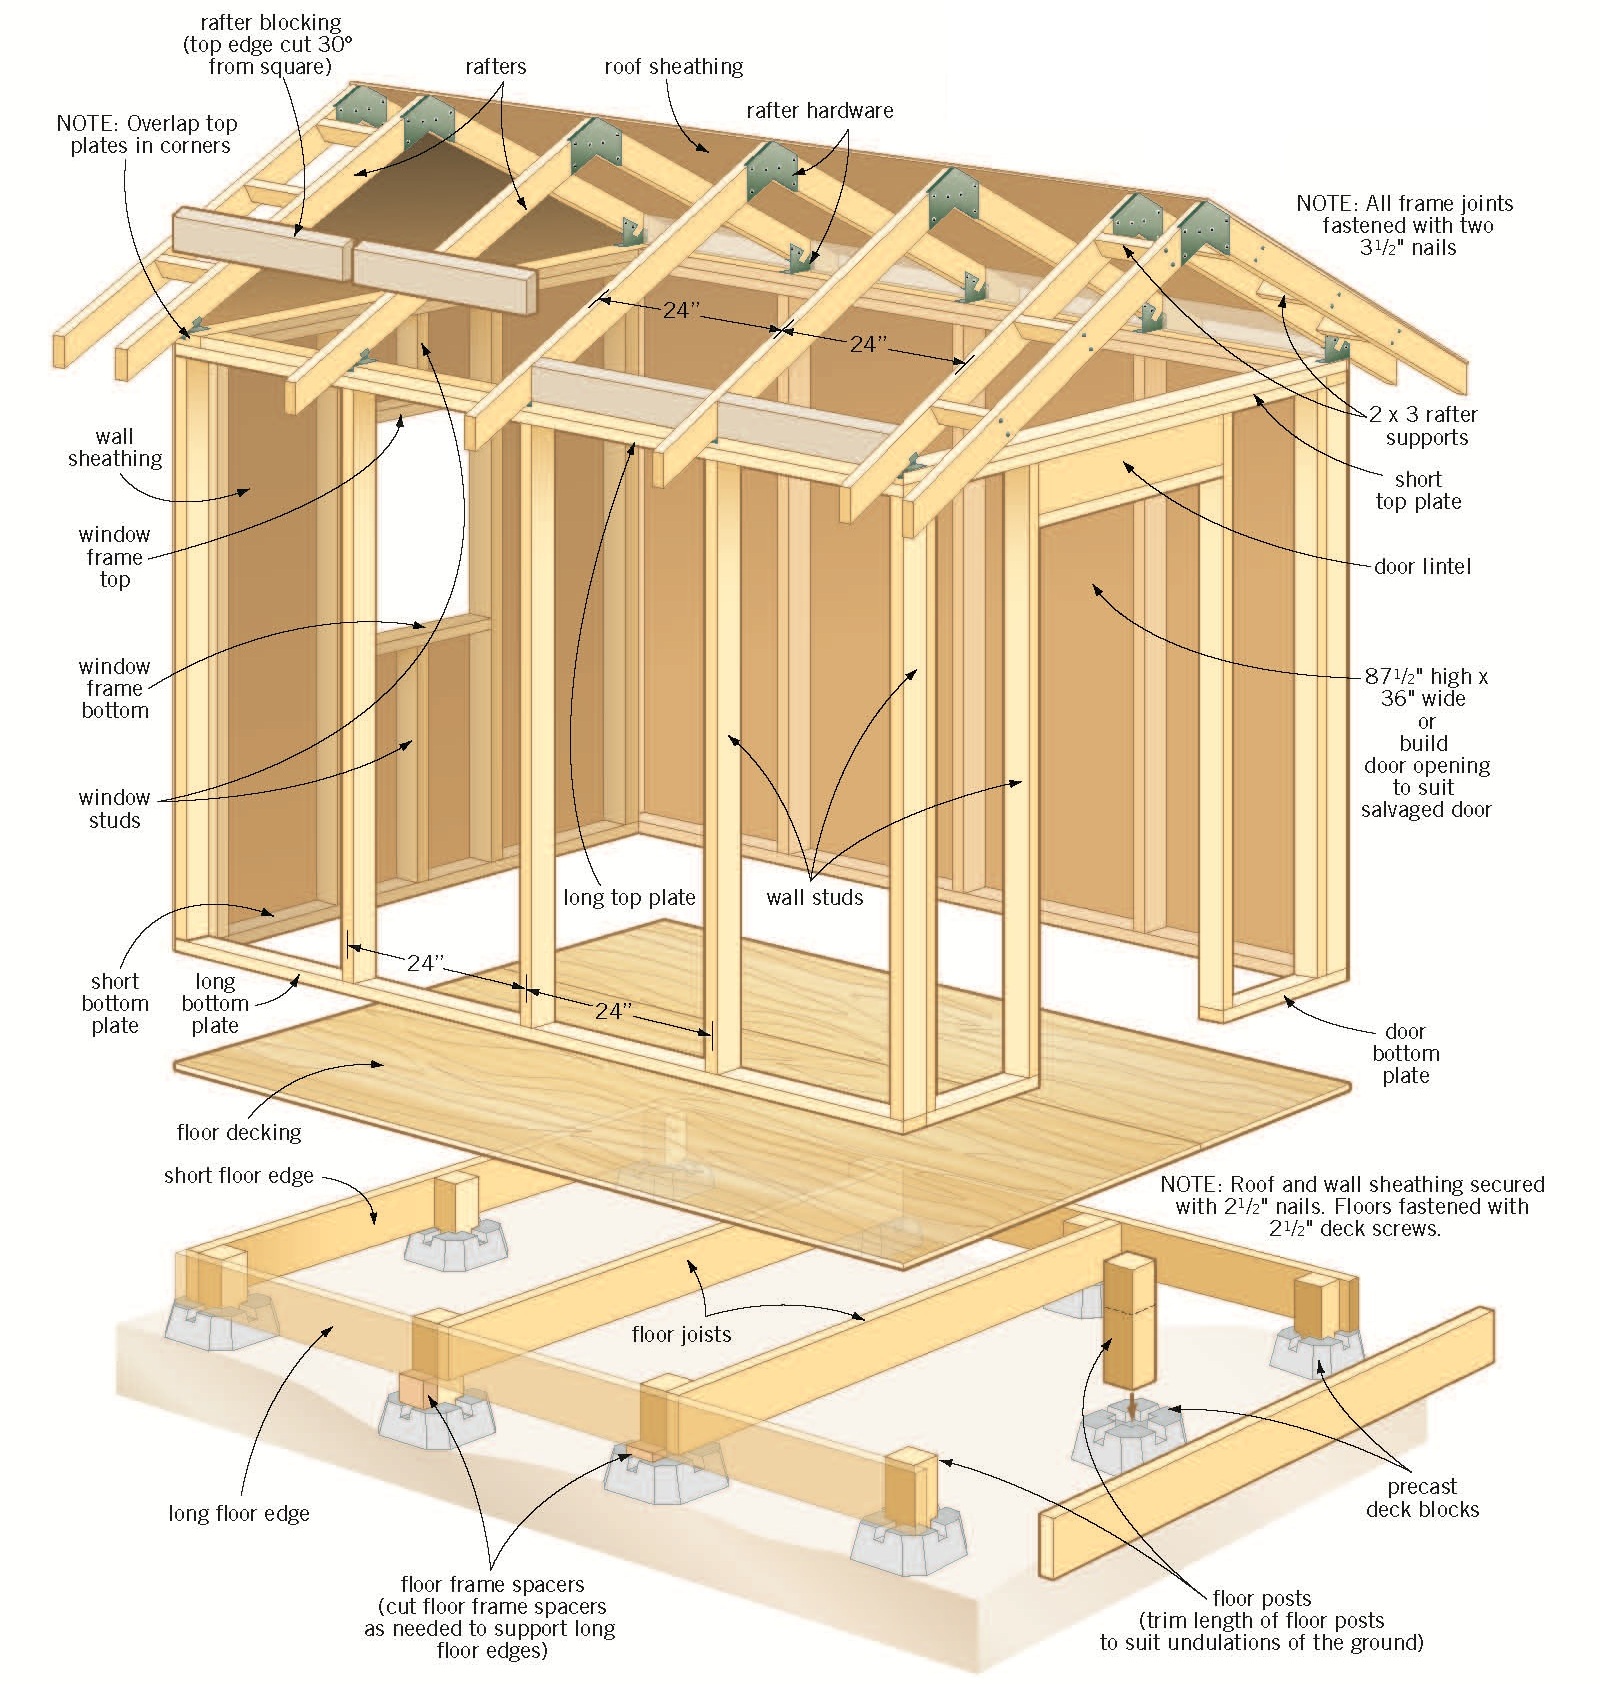
Frame the Shed
Walls
This shed’s walls
are built in the same way that the walls of most
full-size homes are built. The plans show how
2-by-4 top plates and bottom plates extend
horizontally around the perimeter of the
building, with vertical studs defining wall
surfaces. Notice that the two short walls fit
inside the two longer ones, fastened together at
the corners with 3 1⁄2-inch deck screws and
overlapping top plates. Framing is the
most important part of building a quality shed
that lasts for years, so you want to make sure
you do this right if you want your shed to last.
To build the
framing for each wall, begin by temporarily
screwing a 2-by-4 top plate and 2-by-4 bottom
plate together face to face, then set this pair
on its edge on the plywood floor. Next, mark the
position of the wall studs on the edges of both
of these 2-by-4s, spacing the center of each
stud 24 inches apart. The shed plans show
detailed layouts for all walls and how to frame
door and window openings. The shed plans don’t
offer measurements for these openings though,
because this shed is perfect for using scrounged
windows and doors, and these can be of any size.
You can hinge doors directly onto the rough
frame of the shed, but attaching windows will
work a little differently.
A salvaged wooden
sash can be fixed permanently into the shed
frame, but beware: Fixed windows such as these
attract and trap flies, making a buzzing, dirty
mess. I suggest using another type of window. If
you do, you’ll need to create a rough window
frame opening large enough to accommodate the
entire window unit, with an extra half-inch
clearance on the sides, top and bottom for
adjustment.
Separate the
2-by-4 plates, space them about 8 feet apart
on the floor, and nail 92 1⁄2-inch-long
studs between them.
Immediately after you’ve built one long
wall, get some help to tilt it upright,
then use 4-inch deck screws to fasten
the bottom wall plate to the floor,
positioning the screws so they sink into
the edge of the 2-by-6 floor frame.
Assemble and raise the other walls,
adjust them so they’re plumb in the
corners and fasten them with deck
screws. Add a second layer of wall
plates on top of the first, overlapping
across the corners. Complete the walls
by covering the frame with sheathing.
Exterior-grade plywood siding is an
easy, inexpensive choice. It includes
vertical grooves for decoration and
accepts any kind of paint or stain.
Regardless of what you use, don’t
wrestle with the complication of cutting
window openings before adding sheathing.
Instead, apply sheathing to the walls
from the outside, covering them
completely, then cut the window and door
openings afterward, following the framed
openings from inside using a chain saw
or reciprocating saw.
Build
the Shed Roof
While the
walls and framing are the most important
part of your shed, the roofing is the
hardest. Most people have to
consult with a professional shed builder
to get this done right, but with a
little time and effort, the average
person should be able to build a quality
shed roof. The simplest way to
make a roof frame for a small shed is to
use steel connector plates made
especially for the job. Using this
hardware eliminates the need for fancy
cuts on the rafters and will create a
strong shed roof. Cut the 2-by-4 rafters
at 30-degree angles (see the plans),
then bring them together on top of the
building using steel plates (peak
brackets) and screws.
With the
rafters in place, cut two triangular
pieces of wall sheathing to close in
the gable ends, fastening them both
to the top of the wall and the faces
of the outermost rafters with nails.
Notice
how the roof frame sits on top of
the walls and that there are spaces
between the rafters. If you leave
these open, birds, bugs and rodents
will get into your shed. The best
time to fill spaces between rafters
is now, before the roof sheathing
goes on. Cut 2-by-6 blocking to fit
within each space. If you have
access to a table saw, use it to
angle the top sides of the blocks to
match the roof slope. Fasten the
blocks to the top plate with screws.
Even
a small shed looks best with a roof
overhang on the triangular front and
back ends of the building. So,
before you cover the roof with
half-inch plywood, extend the roof
frame by attaching three rafter
supports to each end rafter with
screws, then fasten the overhanging
rafters to those supports.
It’s
much easier to safely handle
rafters, roof sheathing and shingles
when you’re standing firmly on a
scaffold than when you’re balancing
on a ladder. Set up the scaffolding
inside the shed for roof
construction, then move it out next
to the eaves as a shingling
platform.
DIY
sheds offer great value, great
durability, and the opportunity
to exercise your creativity.
Build one yourself, and you’ll
wonder why anyone would ever do
it differently. We hope
you have enjoyed this free shed
plan and come back for more!
Free
Backyard Garden Shed Storage Plans
(Right Click on Image, and Select View as Image or
Save As to See the FULL SIZE Picture)
|


