There are four main
things to consider about a potential site for your barn or
shed: Access to both roads and utilities, soil type,
drainage, and topography. If a number of places on
your property satisfy these criteria, you might also
consider other factors, such as solar orientation, weather
protection, and the direction of prevailing winds.
Access to Roads
Good roads are expensive to engineer and build, even
thousands of dollars per mile if you have to blast bedrock.
They involve excavation design for proper drainage, and
careful selection of materials. You cannot just dump
loads of gravel onto grass or bare earth and expect it to
serve as a sound road surface for very long.
Also, once a road is in place, it has to be maintained.
Gravel needs to be dressed every other year or so because
the finer pieces sift down into the larger rocks.
Blacktop cracks need to be sealed to prevent frost heaving
that can tear apart all your costly work.
If you can position your shed or barn so that is doesn't
need a new road built to it, all the better. If you
want to build your barn away from existing roads and your
region endures winter weather ( and a muddy spring), you
will likely struggle with access over rutty roads and mud
unless you construct a solid road bed. You will have
to decide whether that's a price you are willing to pay to
put off spending what it takes to build a good road.
|
 |
Access to Utilities
You should always consult a licensed electrician in the
planning stages of your shed. Depending on your
circumstances, you may also need to contact the power
company. Local utilities often regulate the maximum
distance between a meter and a breaker panel and whether you
can run an outdoor circuit to your shed or barn directly
from you house's main service panel or whether you need to
have a separate subpanel installed in the barn.
Whether or not your local government requires it, all work
should conform to the requirements of the National
Electrical Code (available at local libraries). If you
will be keeping livestock, bringing water to your barn is an
absolute necessity. You're probably not going to want
the expense of a new water main and septic system just for
your barn, you'll want to hook it up to your house's system,
if possible. In regions with cold winters,
water-supply pipes need to be buried 4 feet or more in the
ground; the closer you are to your well and septic system,
or to the municipal water and sewage lines, the less
time-consuming (and costly) this digging will be.
Remember that some areas impose very strict standards for
septic systems, and require perc tests, special permits, and
inspections. When it doubt, have a talk with your
local building inspector before any work begins on your
shed.
|
 |
Soil
If you have a garden, you may already have an idea of what
type of soil you have on your property -- whether it's
mostly sand, clay, silt, or loam. Before building a
large structure, however, obtain a copy of a local soil
survey map (example below), which should be available from
the Cooperative Extension Service, to find out exactly what
type of soil on which you'll be building. The soil
types are drawing onto arial photographs with a key that
explains the qualities of each soil type, including
engineering properties and how suitable it is for different
types of construction methods.
Soils are rated for their load bearing capacity - that is,
how much weight per square foot they can support without
having to be modified with soil stabilizers such as gravel,
stepped landscaping, or retaining walls.
Bedrock, the most stable building surface, has the greatest
load bearing pressure rating. Sedimentary stone, such
as sandstone, and gravel support slightly less weight.
Sand silt, and clay soil will support much less.
Depending on your soil type, you can increase the width of
the foundation footings to spread the load or even modify
the soil itself by bringing in fill from elsewhere - which
is an expensive option.
If you have any doubts about the bearing capacity of your
soil, consult a soil engineer and the Cooperative Extension
Service. Building on soil that can't support your shed
will cause it to settle, crack the foundation, and rack the
walls.
|
 |
Drainage
Soil must drain thoroughly, especially in areas where the
weather reaches freezing temperatures. Otherwise,
moisture retained in the soil will freeze and cause frost
heaving. Frozen soil can increase in volume as much as
25 percent, which presses the soil (and your barn's
foundation) upward. In cold climates, prevent damage
from heaving by installing your footings below the average
frost depth, which is available from your local building
department.
Its also important to have good drainage around your
structure for water that runs off the roof and groundwater
that may run downhill and be blocked from its normal path by
your structure. The soil around your shed should slope
away from the foundation, generally at 1/4 inch or more per
foot for at least 6 feet. If needed, a swale, or
shallow depression, can be used to direct surface water.
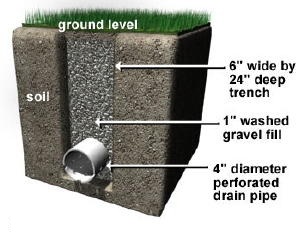
A perimeter drain made of perforated pipe can be used to
direct groundwater away from your building into a drainage
ditch or collection pond, as shown in this pic:
|
 |
Topography
The topography of your shed site is the three-dimensional
shape of your lot including major physical characteristics,
such as standing water, large rocks, and trees. You
can alter the topography of your lot, but it is expensive.
Generally, its better to adjust your shed to the topography.
A sloped site presents challenges when designing your
foundation slabs. For example, you must excavate a
flat, which could mean building a retaining wall. For
walls, you can excavate the slope or use a stepped
foundation. However, a sloped site isn't always a bad
thing. If the lot slopes to the south, for instance,
you will have a site that's warmer than surrounding flat
areas because the ground sloping 10 degrees to the south
receives the same amount of solar radiation as level ground
700 miles to the south. Plus, mildly sloped sites are
good for drainage, so if you prepare your shed's perimeter
drains and swales properly, you will have a well drained
site and dry barn.
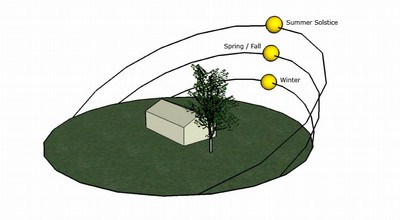
Sun and Wind
In the Northern Hemisphere, the climate is slightly warmer
on south facing slopes and slightly colder on north facing
slopes. To reap gains from passive solar heating,
buildings should have the longest dimensions running
approximately east and west with the most windows on the
south side and few on the north. In hot climates,
you'll want to do just the opposite to prevent solar gain.
Of course, other elements in your environment may not permit
you to orient your shed this way.
When you position your shed, note that positive pressure
from the wind will drive cold air into the barn, and
negative pressure on the far side will suck warm air out of
it. As you orient your barn for sun and wind, keep in
mind that, for the winter, you want to expose the wall with
the most glazing to the south to collect solar heat while
exposing the fewest openings to the ends of the barn that
are perpendicular to the prevailing wind.
As for trees, there are different scenarios for dealing with
either year-long prevailing winds that come from one
direction or prevailing winter winds that shift from north
to south between winter and summer.
The arrangement of trees is important, but so is the type of
tree you plant. Deciduous trees bear leaves in the
summer but lose them during the cold winter months.
These trees are excellent for the south side of your shed
because their leaves will shield the roof from the harsh
summer sunlight and heat, and when the leaves drop, admit
sunlight and heat in the winter. Carefully placed
after close observation of prevailing winds, deciduous and
coniferous trees can be used to direct cooling breezes
toward your structure in the summer and block cold winds in
the winter.
|
 |
Power to the
Site
You can often bring power to saws and drills by running a
power cord from a nearby house. Just be sure the cord
is heavy enough gauge to support the amp rating on your
tool. An undersize cord can deprive a tool of the
needed power and ruin the tool. This is because power
encounters resistance in the cord and drops off over longer
distances. You decrease this resistance by using
heavier gauge wire. Generally use 10 or 12 gauge
cords. They are not as flexible and light, but they
will protect your tools in the long run.
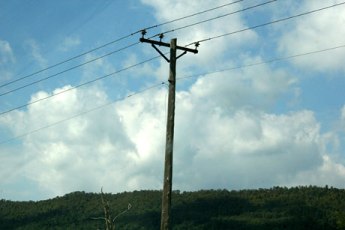
If you can't get power nearby, you have two choices:
make power with a generator, or install a temporary power
pole. This setup includes a conduit mast, a meter base
and meter, a turn off switch, GFCI breakers, some outlets,
and a rod hammered into the ground to act as a ground.
Some utility companies will set up these poles for you for
an installation fee and monthly power consumption charge.
They will often have a minimum charge. An electrician
can make one for you, but it will still have to be inspected
by the utility company before power is turned on. The
building inspector may also want to take a look before it is
approved for use.
If you do the work yourself, be sure to check specs with the
local utility because there are often strict requirements
about weatherproofing, pole height and depth into the
ground, minimum distances from the service to the center of
the street, and pole placement on the site. After you
have the pole approved and power is flowing, you'll have to
distribute it through the site through GFCI protected cords
and weatherproof outlet boxes.
Once you have found the
perfect site for your shed, you will need the perfect shed
plans. If you have any interest in building your own
shed, you have to check out
our
shed
plans before you go. You will be so glad you did,
you can save a ton of money by building your own shed.
Currently, our best value package contains thousands of woodworking
plans and wood tips such as this. Our categories are always available on
the left of your screen on any page of our site.


