|
There
are perfectly good reasons for building an outdoor
shower at the cottage. It’s certainly cheaper than a
second bathroom, yet it provides a welcome
three-season facility when the cottage is overloaded
with visitors. You can wash after a swim (you’re
already wet, so why not get clean?) or after
finishing a particularly dirty task, and it’s by far
the best place to give the cottage dog a bath. It is
also easier to maintain than its indoor counterpart.
You could even argue that, with fresh air and a view
of the sky and trees above, you’ll be communing with
nature.
But let’s face it, there’s another reason we like
using an outdoor shower. It’s—just a little—naughty,
kinda like skinny dipping. You’re outside, the sun’s
shining, water’s involved, you’re naked, and someone
probably disapproves.
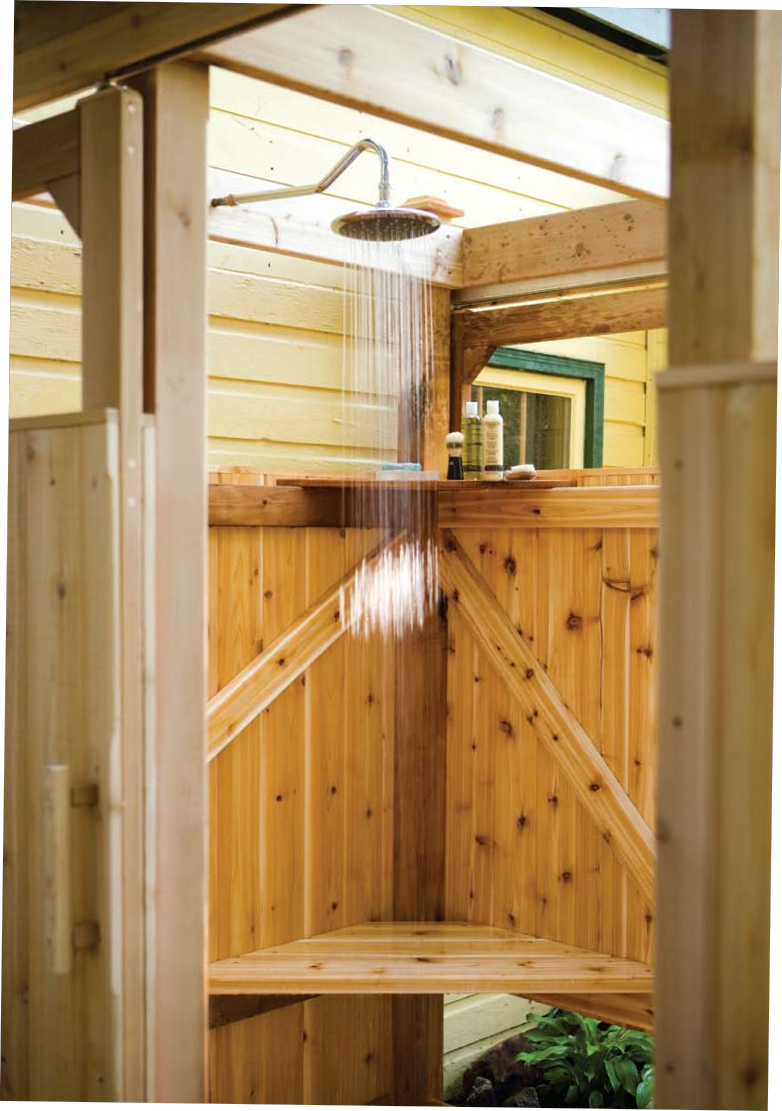
For some, a shower head and flat stones suffice, but
we wanted to build a shower that would provide that
sense of freedom while giving some privacy for those
who prefer not to bare all. We incorporated sliding
doors in the design. They’re less visually obtrusive
than hinged doors when open, and since they need no
clearance around them, the structure can be located
very close to trees. The shower is sited in a
secluded spot, so the cottagers plan to leave the
sliding doors open almost all the time, closing them
only when they have guests.
|
MATERIALS
All wood is cedar, except where noted.
8 4x4 x 8' (length may
vary according to terrain): posts
8 4x4 post caps
10 2x4 x 12': framing
2 2x6 x 16': headers,
dressing bench
3 2x6 x 10': cross
headers, corner bench, overhang support
320 lin. ft. 1x6 tongue-and-groove: walls
2 1x6 x 8': shelves
4 3/4x6 x 14' decking:
deck boards
3 3/4x6 x 16' decking:
deck boards, outer valance, doorstops
1 2x6 x 14'
pressure-treated spruce: rim joists
3 2x6 x 10'
pressure-treated spruce: joists
4 1x4 x 12' spruce:
temporary bracing
4 2x2 x 3' spruce stakes
8 1' x 1' patio stones
(you may need more)
HARDWARE
32 3/8" x 6"
galvanized carriage bolts, nuts, and washers
2.5 lbs #10 x 3!/2" deck
screws (beige)
1.5 lbs #8 x 3" deck
screws (beige)
2.5 lbs #8 x 2" deck
screws (beige)
50 #8 x 1!/4" screws
1 lb 2"
galvanized finishing nails
4 medium
T-hinges
2 small
pulls
2 72"
pocket-door hardware sets outdoor-rated wood
glue plumbing fixtures |
|
  |
As with any project,
you could make changes to reduce the complexity and
cost, and to customize it to your requirements. We
included two doors, a luxury that works with the
traffic patterns at this cottage, but may not be
necessary at yours. Eliminate one door or the entire
changing area, if you don’t need them; make the
floor plan larger or a different shape to fit your
location. You could also adjust the height of the
walls to suit your family’s average stature and
desire for privacy— make it as open to nature as
modesty allows.
I used cedar for most of this project because of its
obvious natural appeal. But as most cottagers know,
it ain’t cheap! Pressure-treated 4x4s and deck
boards are an acceptable alternative, and untreated
pine tongue-and-groove for the walls will last for
years here, since it’s above ground and will dry
quickly after getting wet.
Before you build, note that the effluent from an
outdoor shower is considered grey water and requires
proper disposal. This wastewater is commonly handled
by draining it to either a leaching pit or septic
system. Check with your municipality regarding
building permits and possible restrictions such as
shoreline setbacks.
This is a relatively straightforward project, and
two moderately skilled DIYers with a little basic
plumbing experience should be able to knock it off
in a couple of weekends. The cost— mostly for the
cedar, which I warned you is not cheap—is about
$2,500, including the plumbing fixtures.
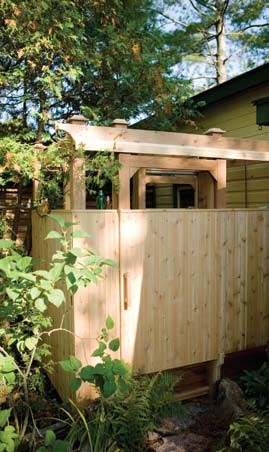
Choose your site
Is there an ideal place for an outdoor shower? In
most cases, you want a sheltered spot, because a
windy location will shorten the
I’m-comfortable-standing-outside-while-wet-and-naked
season considerably. Heavy winds will also require
setting the corner posts in concrete footings
instead of simply placing them on 1'-square concrete
patio stones, as I did. If you have neighbors, give
some advance thought to their sightlines: Lay out a
few boards on the ground to mark the walls and bang
a few stakes into the ground where the corners and
the edges of the doors will be. Then, stand inside
the shower area. You’ll be able to see what your
view of the lake will be and what your neighbors’
view of you will be—if you can see them, they can
see you. Moving the shower slightly, or even just
repositioning a door, can make a big difference.
Consider the plumbing, too—how near is the water
supply, and how easy is it to install a legal
drainage system?
The bare-bones skeleton
1. Start by leveling four patio stones for the
corner posts. (You may have to stack a couple to
help achieve that level base.) This structure
is small and rigid enough that a little winter
heaving won’t do any harm, so full
below-the-frost-line footings aren’t necessary
unless it’s in a very windy spot.
2. If there’s any digging needed for your drainage
system, do it now, before you start building
overtop.
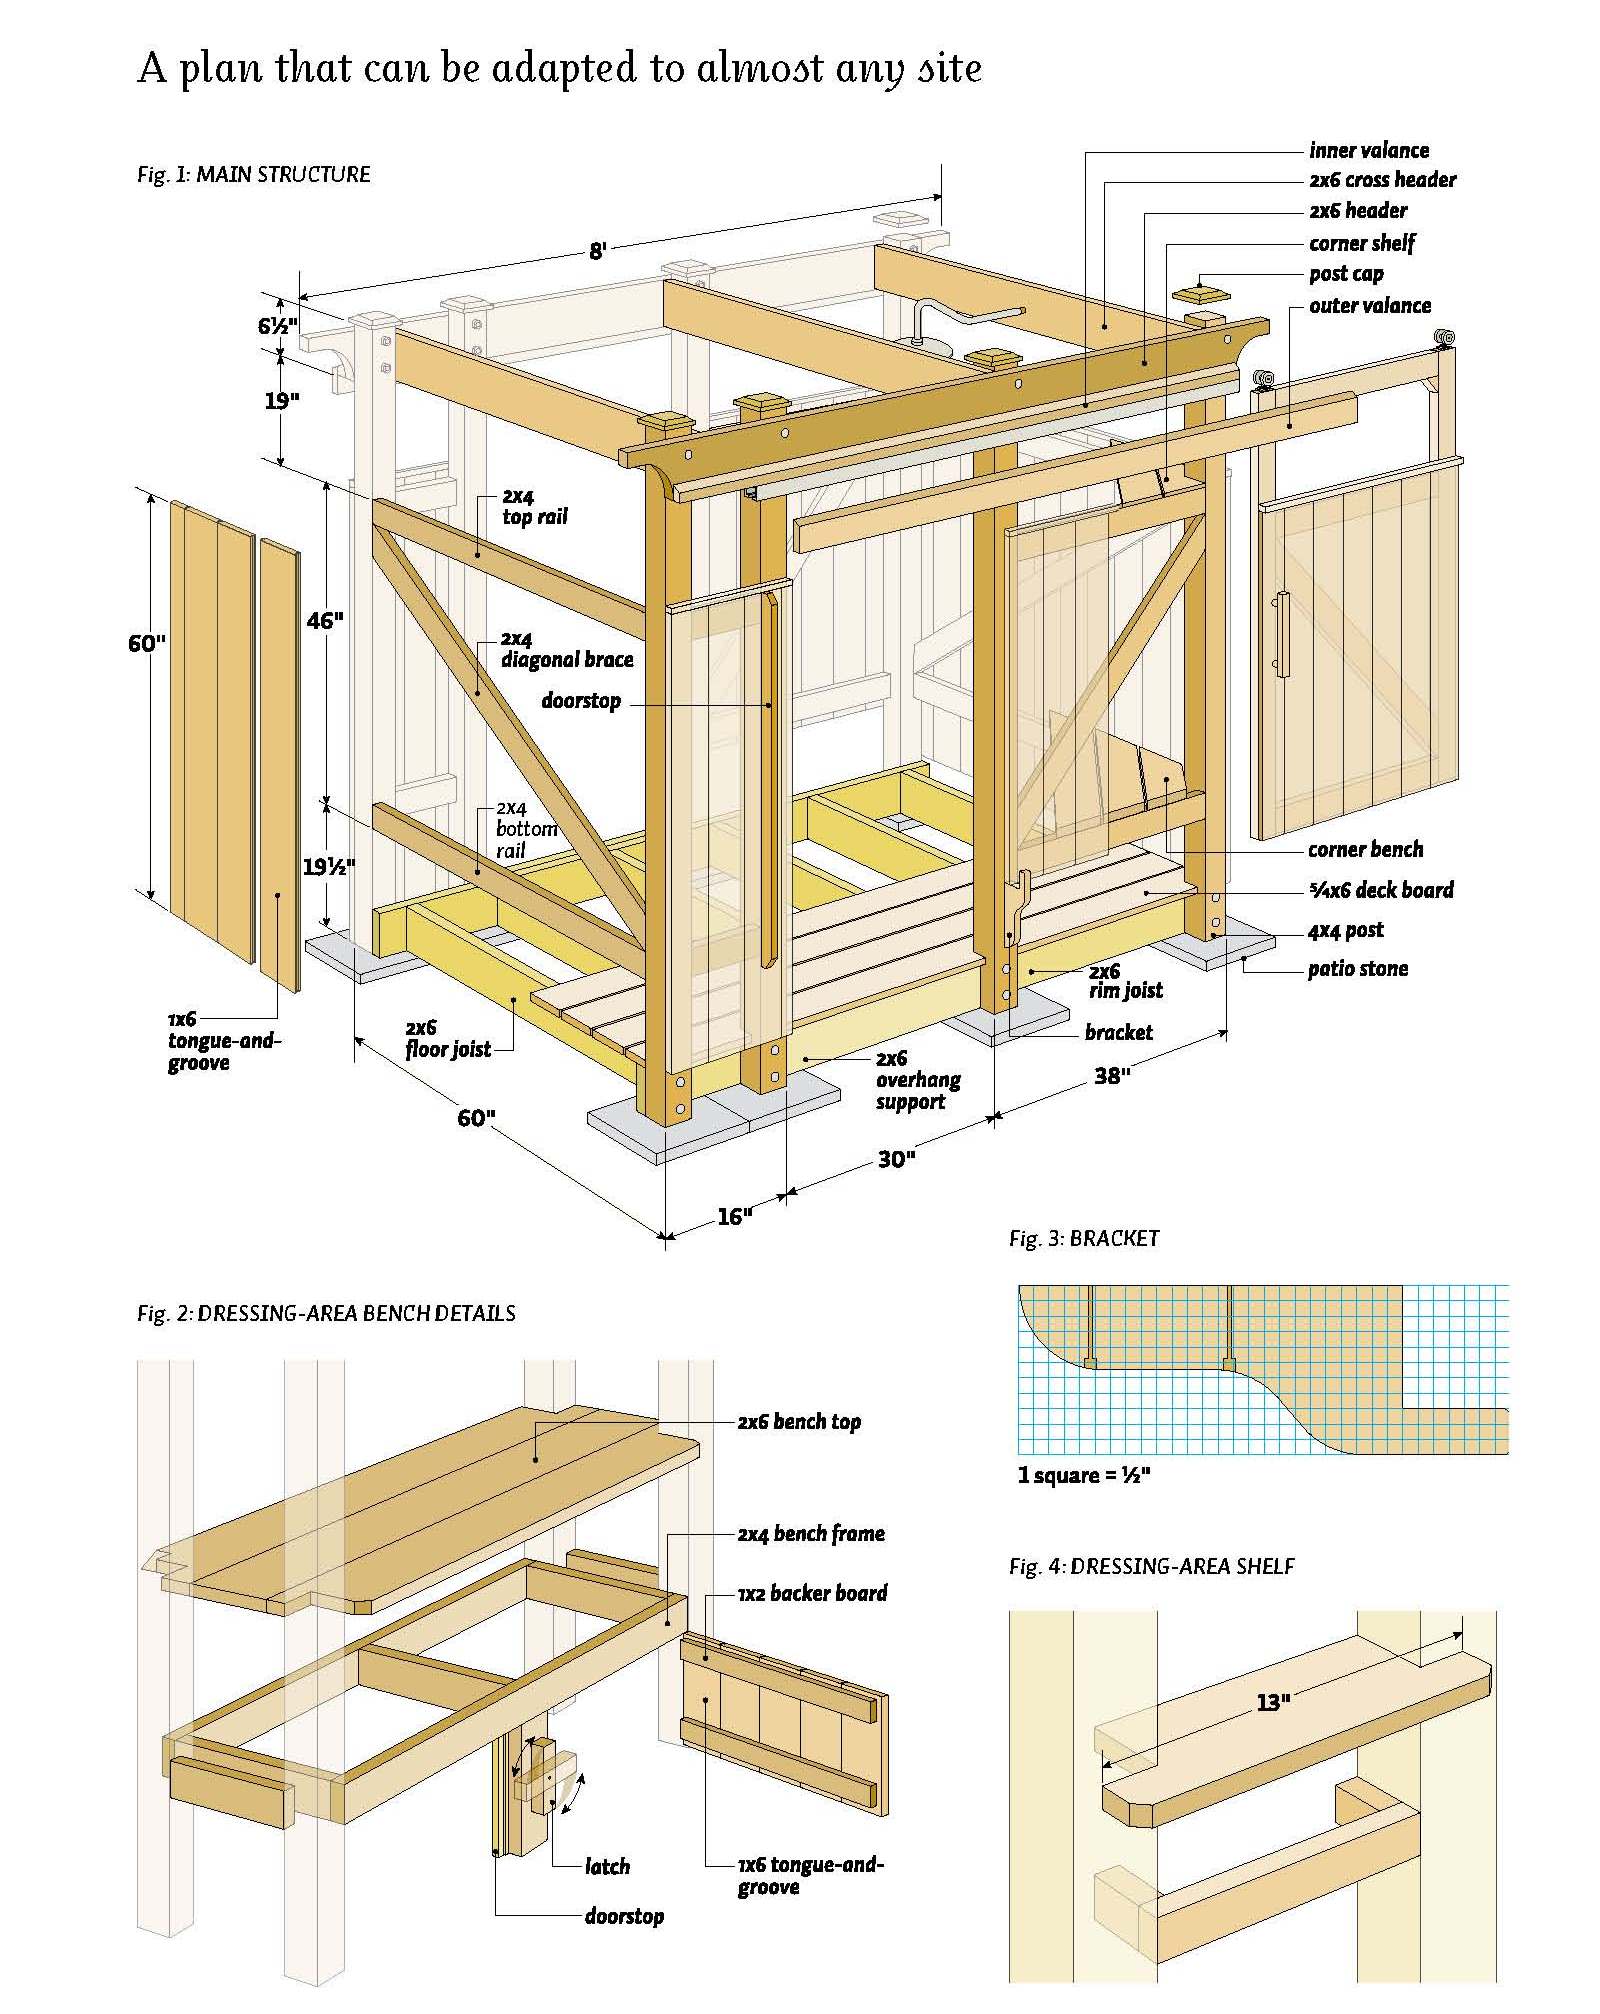
3. Cut and assemble the main elements of the end
walls— 4x4 corner posts, 2x4 frames, and
tongue-and-groove siding— in the ground (see
figure 1). I toe nailed the 2x4 frame pieces to the
posts with #10 x 3 1/2" deck screws and attached the
siding with #8 x 2" deck screws. Note that the
siding is longer (60") at both ends of the structure
and on the sides of the storage compartment; it’s
shorter (48") elsewhere. As well, position the
siding 1" above the top rails, because it just looks
better that way. Once the end walls are built, stand
them up and brace them.
4. Cut to length and scallop the ends of the two 8'
headers, then clamp in place on the posts. Cut two
2x6 pressure-treated rim joists for the floor
structure and clamp in position on the posts too.
Once the structure is plumb and square, and headers
and rim joists are positioned correctly, drill 4"
holes and bolt the clamped parts together (two bolts
per intersection). The lower set of bolts on the
headers must be flush with the surface, or the outer
valance won’t sit flat. You can either countersink
the bolts or over tighten them a bit to pull the
heads down.
5. Position four more patio stones for the other
posts. Bolt posts
to headers and rim joists. Trim posts to length, 1"
above headers. Screw post caps on top of posts.
6. Cut three cross headers and screw to the tops of
the posts, as shown in figure 1.
The floor
1. Cut 2x6 pressure-treated spruce joists to length
and attach between the rim joists with #10 x 35"
screws. Remember to install plumbing for the drain.
2. Cut nine deck boards for the floor from 5⁄4x6.
(Two boards have 2"-deep notches to fit around the
posts.) Fasten the boards in place with #8 x 3"
screws, making sure to leave even gaps (roughly
3⁄16"). To create access to the drain for
winterizing, here’s what I suggest: Locate the deck
board that’s overtop the drain. Cut out a section,
lining up your cuts over the centres of two adjacent
joists. Pre drill holes near these cuts in order to
avoid splitting the ends of the boards when you
screw them in place. In fall, unscrew this short
piece to fill the drain with non-toxic antifreeze
and plug it. As well, add an overhang support for
the edge of the deck board at each door: Sister a
30" length of 2x6 to the rim joist, between the
posts framing the door.
Side walls and doors
1. Cut and install the 2x4 frame and the
tongue-and-groove for the side walls.
2. Construct doors as in figure 8, taking care to
build them square. I used outdoor rated glue and two
#10 x 35" screws at each corner. Note that the two
screws should be offset from the centre line: one
screw 1" to the left, the other 1" to the right.
(This keeps them clear of the screws for the
pocket-door hardware.) You’ll have to countersink
them about 15". I filled the holes with pine plugs
because I like the contrast of pine and cedar. The
corner bracket is optional.
3. Rip lengths of tongue-and-groove to 6" x 8" to
make the cap trim for the walls and the tops of the
door panels. Nail in place, flush to the inside
surface.
4. Although the pocket-door hardware I chose is
meant for interior doors, it’s sturdy enough to use
outside. I did replace the screws in the package
with #8 x 3" deck screws to mount the supplied
brackets to the doors more securely.
Door details
1. From an 8' length of deck board, rip two inner
valance pieces as in figures 1 and 7. Trim to 7' and
mount with 2" screws and glue, flush with the bottom
of the headers. Rip the outer valance pieces from 8'
lengths of the 6" tongue-and-groove. Use finishing
nails and glue to attach them.
2. Attach the pocket-door track with the screws
provided. It should extend 1" beyond the post that’s
at the front of the bench. With help, hang the door
in the track. You may have to make adjustments so
the door is square in its opening, the cap trim
pieces on the door and wall align, and the door
slides freely. First, you can move the door away
from or closer to the structure: The bracket holes
are slotted for this tweak, but you’ll have to take
the door off the track first. As well, you can
adjust either end of the door up or down by turning
the hanger bolts. There’s a small wrench for this
purpose included with the hardware (try not to lose
it).
3. Rip 15"-wide doorstops out of 5⁄4x6. Cut to
length (4') and miter the ends. Close each door (the
2x4 frame should be parallel to the 4x4 posts) and
place the closed-position stop. A couple of 2"
finishing nails or clamps will hold the stop while
you screw it from the inside (for strength) with #8
x 12" screws. In the same way, open the door and
mount the open-position stop.
4. Add a bracket to prevent the bottom of each door
from swinging out as it’s pulled open or closed, as
well as to stop the door from rattling in the wind.
Cut these brackets from leftover 2x6. See figure 3.
Mount to the posts with 35" screws. It’s okay if the
doors rub a bit against the brackets, but they
shouldn’t bind.
5. Use corrosion-resistant handles for the doors or,
as I did, fashion some from 1" by 1" lengths of
scrap wood. Or make some out of other materials,
such as driftwood or small cedar branches. After the
winter, it’s possible frost heaving will shift the
shower; if the track isn’t level, the door may not
stay open or closed. Fortunately, the whole
structure is small and light enough that it can be
lifted slightly while you shim under the posts to
re-level it.
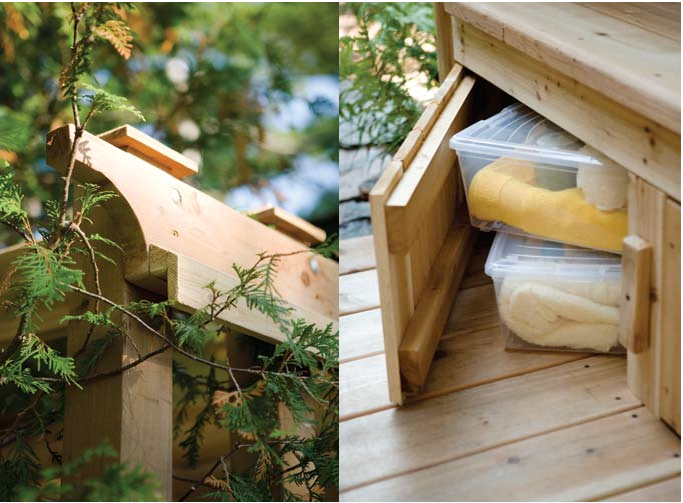
Benches and storage
1. Make the corner bench from three pieces of 2x6,
ends cut at a 45° angle. Mount each to the frame
with 3" screws, leaving about 2" between the boards.
2. The dressing area bench consists of three lengths
of 2x6 on top of a 2x4 frame (see figure 2). Cut and
install the 2x4s, then screw on the 2x6s, first
notching them to fit around the posts and the
diagonal brace.
3. Cut short pieces of tongue-and-groove for the
storage-compartment doors and attach with #8 x 12"
screws to 1" by 2" boards (ripped from a deck
board). I used T-hinges to hang the doors. Fashion a
simple doorstop and latch, and make your own pulls
from offcuts or driftwood, or use off-the-shelf ones
as I did.
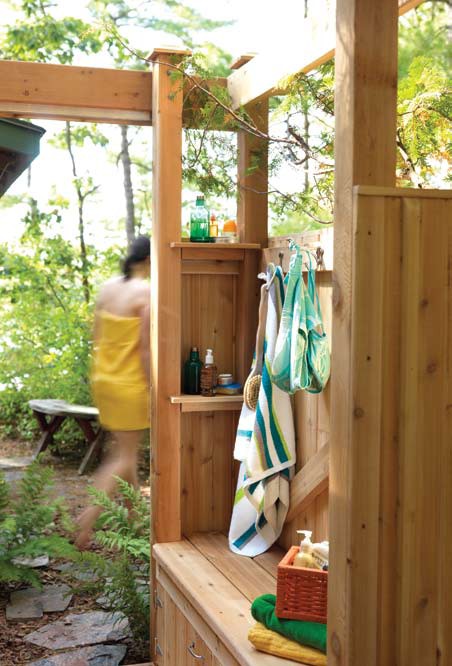
Shelves
1. Above the corner bench, install a simple shelf.
Same idea as the bench, just smaller, using two
lengths of 1x6 cedar. Unlike the corner bench, I
notched the first board to fit around the 4x4 post.
Screw the pieces to the 2x4 top rail.
2. I added five small shelves (see figure 4) in the
dressing area, screwing supports (2"‑wide strips
ripped from 1x6) to the 4x4 posts, and then topping
with shelves cut from 1x6 and notched to fit around
the posts.
3. A few coat hooks, installed above the bench,
complete the shower construction.
Don’t stain, paint, or finish the wood—in an outdoor
shower, even the wood should be au naturel. Any
finish will be difficult to maintain; in time,
nature will provide a beautiful patina. You might
give the surfaces a scrub-down with a power washer
once in a while, but that’s it.
As a final touch, I looked for any corners, such as
those on the doorposts, that could make for a nasty
encounter with a naked body. I softened them with my
router and a 6" roundover bit, but if you don’t have
a router, plane and sand, or simply sand, these
edges.
|
Free
Outdoor Shower Wood Plans
(Right Click on Image, and Select View as
Image or Save As to See the FULL SIZE
Picture)
Free
Outdoor Shower Wood Plans
(Right Click on Image, and Select View as
Image or Save As to See the FULL SIZE
Picture)

Free
Outdoor Shower Wood Plans
(Right Click on Image, and Select View as
Image or Save As to See the FULL SIZE
Picture)
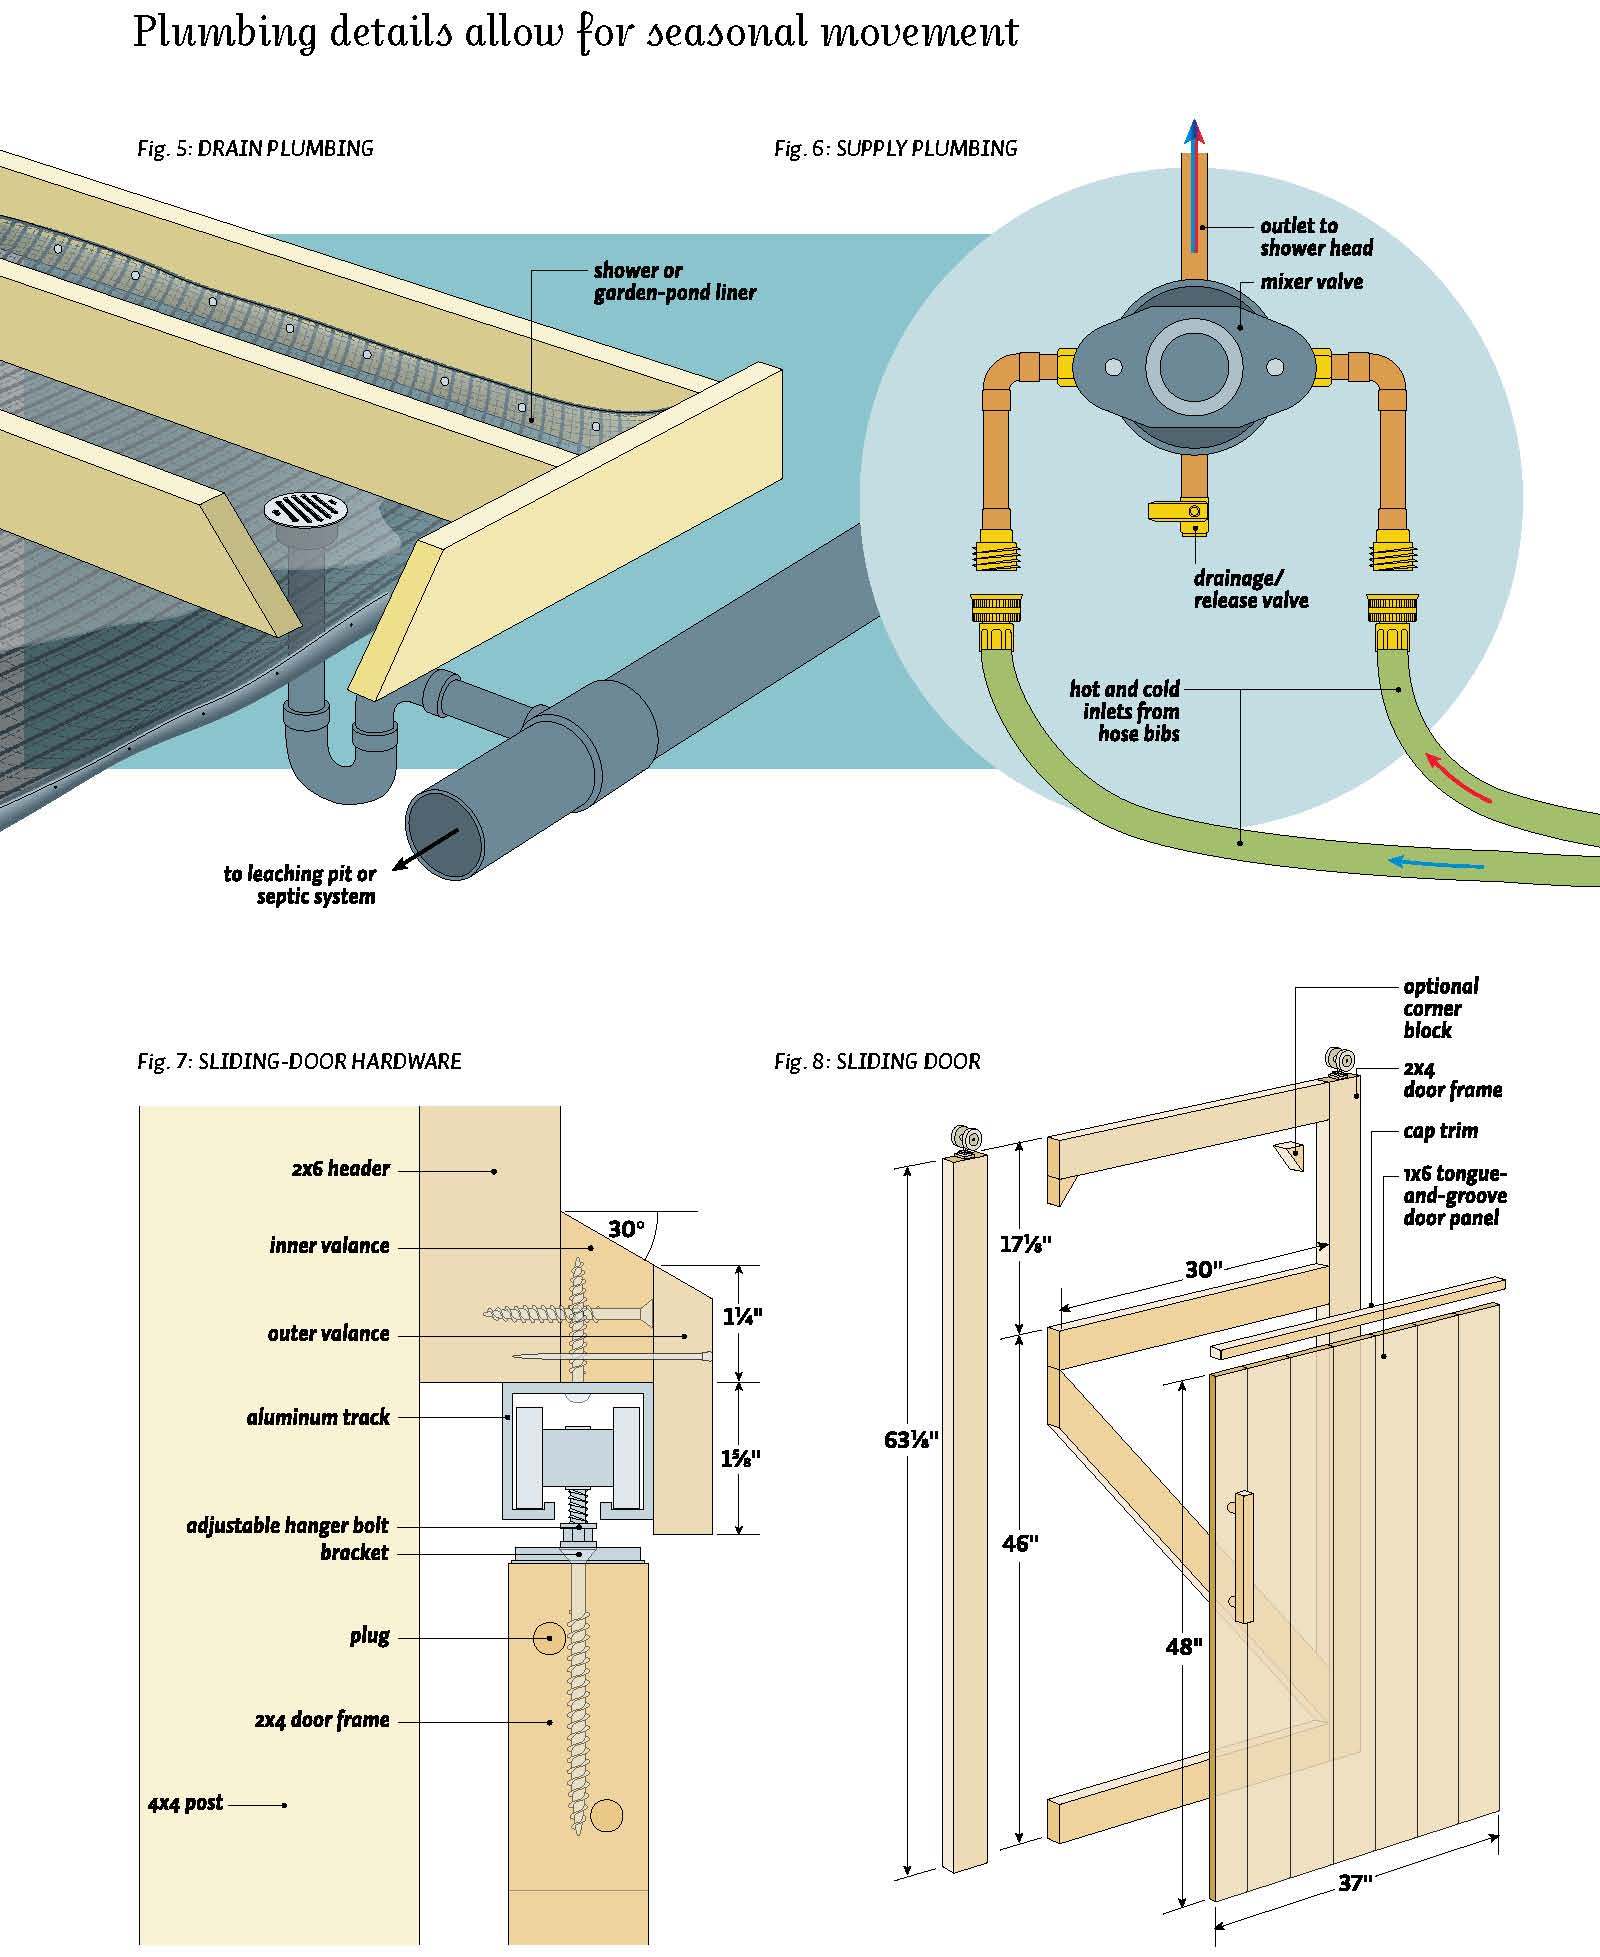
Water in
Supplying water to an outdoor shower
is a lot easier than many other
cottage plumbing projects for one
reason: access. Little, if any, of
the work is under the cottage, where
you’re inevitably pulling yourself
through dirt, commando-style, with
mere inches of headroom and unholy
hordes of bloodthirsty insects all
around.
Working on a flat, non-flammable
surface (i.e., not the deck), you
can solder all the parts together
for the mixer valve and shower head.
Start at the mixer valve, following
the instructions that come with it.
You’ll need a short stub of pipe
with a valve on the bottom outlet,
which usually connects to a tub
spout. Open this valve before winter
to drain the mixer valve so it won’t
freeze. The top outlet directs water
up to the shower head. The exact
fittings you need may vary with the
design of your shower head; staff at
a plumbing store can help you find
the right ones from among the dozens
of different bits and pieces
available. The two side outlets are
for hot and cold water coming in.
Here, I installed threaded fittings
to accept the garden hose I used to
convey water from cottage to shower.
Why a garden hose? The outdoor
shower is designed to accommodate
frost heaving, so I wanted to avoid
rigid pipe, which could break under
the strain of seasonal movement. As
well, hoses make prep for winter a
breeze; they can be removed and
drained in a matter of minutes.
At the cottage end, you need two
outdoor hose bibs (the taps that you
screw the garden hose into). You may
already have one for cold water, but
you’ll probably need to install one
for hot.
Water
out
Once water leaves the shower head
and touches you, it’s considered to
have cooties and must be disposed of
properly. The more technical term
for it is “grey water.” In some
circumstances, it can drain into a
leaching pit— essentially an
elaborate hole in the ground—out of
which it percolates to be treated by
soil bacteria. Leaching pits, a.k.a.
Class 2 Sewage Systems, are
regulated by building codes, which
sets out where they go and how they
must be built.
It’s often much less work to tie the
drain into the existing septic
system, especially if the shower is
near the cottage. A trap in the
drain will prevent sewage gases from
escaping. (While these gases aren’t
as dangerous emanating from an
outdoor shower as they can be
indoors, they are just as
unpleasant.) Each fall, you’ll have
to winterize this drain, by pouring
non-toxic antifreeze into the trap
and blocking the drain hole (to
prevent rain from diluting the
antifreeze).
But how do you collect the grey
water to get it into the drainpipe?
Some people install an acrylic or
fiberglass shower pan under the deck
floor. Another solution, which will
drain a larger floor area, is to use
a flexible, waterproof PVC shower
liner or even a garden pond liner. A
shower liner is usually used indoors
with a poured concrete pad to
prevent leaks. In this application,
you can simply attach its edges
(with roofing nails) to the joists,
forming a large catch basin. Insert
and secure a standard shower drain
in the liner and connect it to the
septic system or leaching pit. You
may have to dig a shallow depression
for the liner so the drain is at the
lowest point. |
|
|


