|
I love
outdoor cooking, but it does bring up one of life’s
profound mysteries. At the house, there’s a
wide
open lake, acres of empty land nearby, and never
more than a small crowd of people around. So much
outdoor space to use and enjoy, and it all somehow
disappears in front of the barbecue. There’s just
never enough room for preparing food or getting it
from the grill onto plates. The side tables on my
’cue will barely fit a single plate or a couple of
spice bottles.
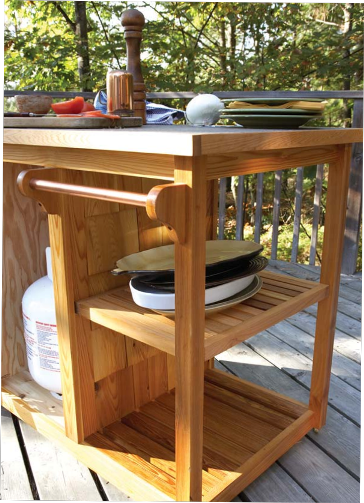
In the kitchen, an island gives that fl at, stable
surface, versatile counter space with all-around
access. This outdoor work center offers the same
utility, and stands up to the elements. With storage
for charcoal or propane along with barbecue tools,
and a design that allows for personalization, this
island puts outdoor space where it’s needed.
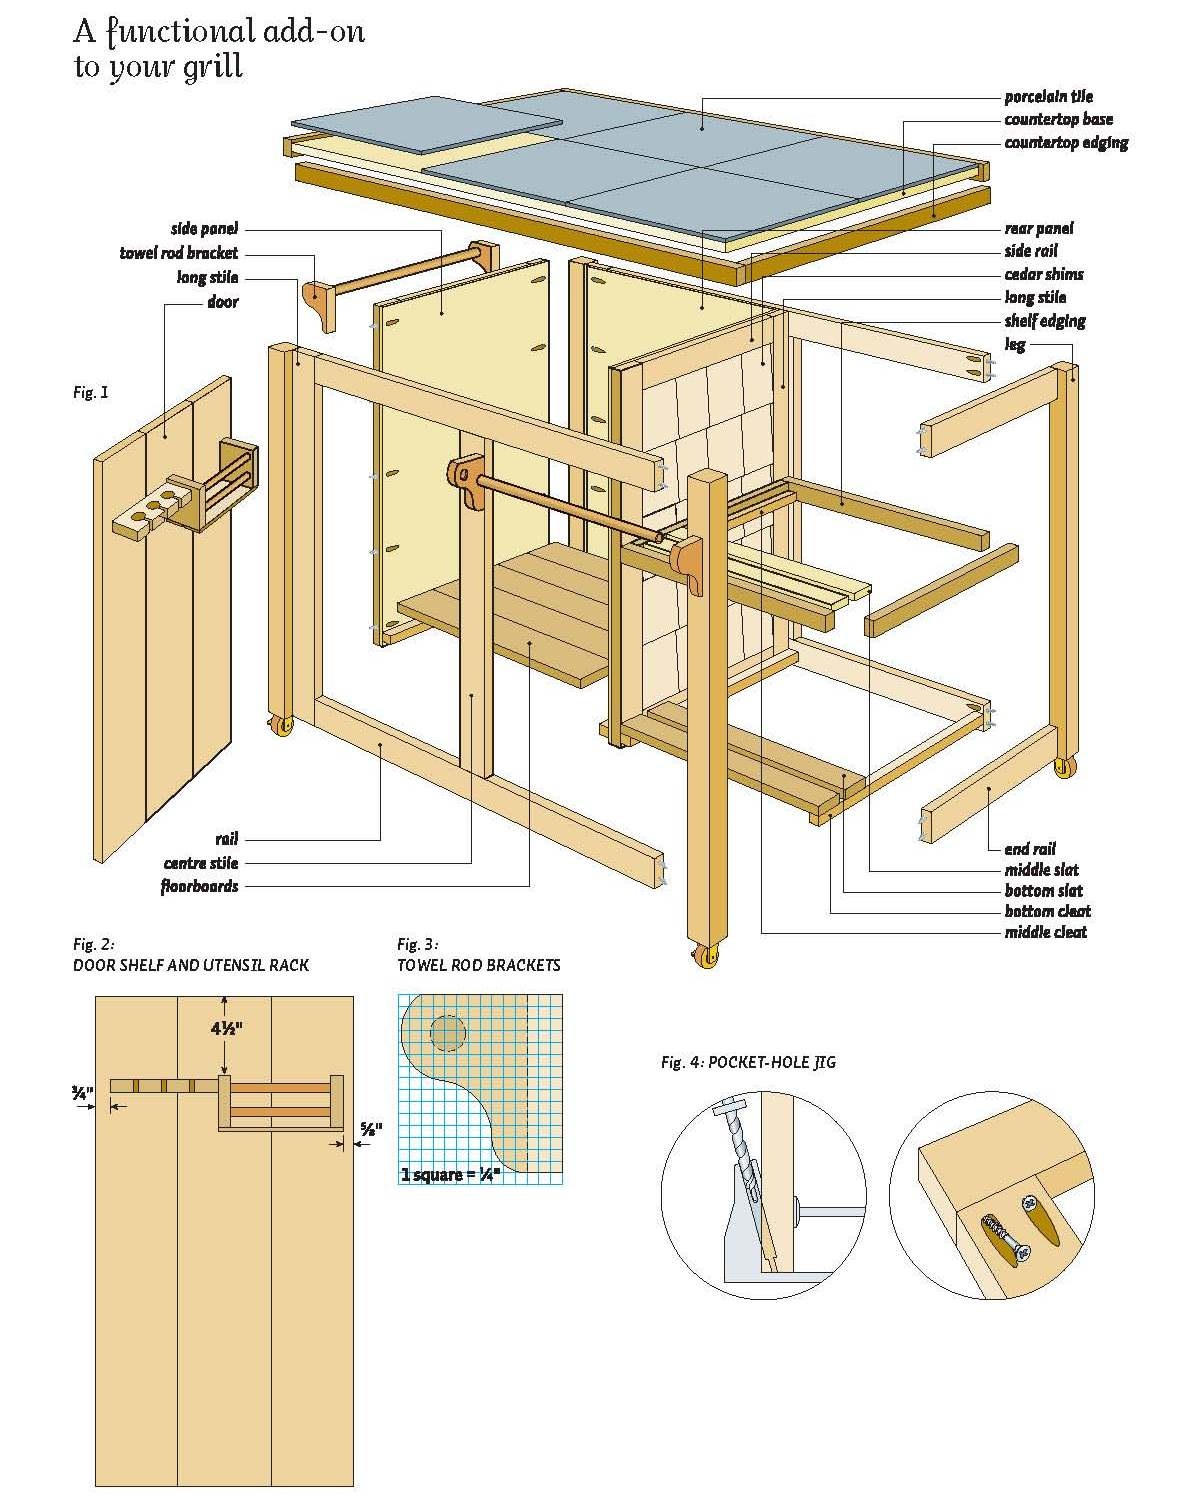
This project uses 1x6 cedar fence boards (which are
actually " by 5 "), 2x2 cedar spindles (again, in
real life these are 1 " square), and construction
grade spruce plywood. While it may look complex to
build, the modular construction and pocket-hole
joinery make this project suitable for all skill
levels. The only tools required are a table saw,
drill, miter saw or hand saw, a pocket-hole jig, and
a hot-glue gun.
|
MATERIALS
All wood is 3/4"-thick cedar, except where
noted.
Front and rear
4 rails: 2" x 30"
2 long stiles: 2" x 31"
2 centre stiles: 2" x 27"
4 legs: 1!/2" x 1!/2" x 31"
Panels
Side and center panels:
20" x 31", !/4" spruce plywood
4 long stiles: 2" x 31"
4 side rails: 2" x 16"
Rear panel: 16!/2" x 31",
!/4" spruce plywood*
2 end rails: 2" x 20"
1 bundle cedar shims
Top
Countertop base: 24" x 36",
3/4" spruce plywood*
Countertop edges:
2 each of 1¼" x 24" and
1¼" x 37!/2"*
Door
3 pieces: 5!/2" x 30 "
Cabinet bottom and shelves
4 bottom cleats: 3/4" x 20"
2 middle cleats: 3/4" x 183/8"
4 shelf edges: 1!/2" x 18!/2" *
Floorboards: leftovers
Shelf slats: leftovers
Hardware
!/2" copper pipe
3/4" copper pipe
1 pair hinges
4 casters
4 brass hooks
Shelf support pins |
|
 |
Begin with
front and rear assemblies
1. Rip your fence boards into 2" strips on the table
saw, setting the off cuts aside to use later.
Crosscut the four stiles and rails to length, then
drill two pocket holes into the backside of each end
of the four rails and the two shorter stiles.
Next, cut four sections of 2x2 cedar spindles to 31"
to make the legs, and get ready to assemble the
frames.
2. Working with the components face down on a large
table or the floor, attach the top and bottom rails
to the long stiles, making sure the top edges are
flush. Next, fasten each centre stile in place,
leaving 14" between it and the long stile. Finally,
fasten the frames to the legs. The rails at
the open end are attached to the legs with
pocket-hole screws, while the end with the stile is
just glued in place using outdoor-rated wood glue
and clamped until dry. Because the legs are 1 "
thick, there will be a " off set from the stiles and
rails. Attach the legs so they are flush on
the back side, making sure that the front and rear
assemblies are mirror images of each other.
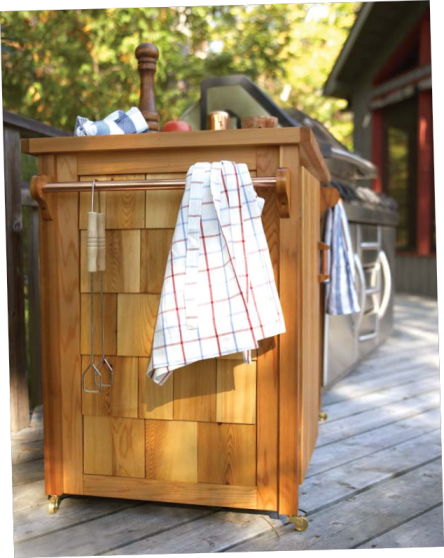
Make two panels
1. The framed cedar-shake panels that join the front
and back assemblies look great and are very easy to
make. Cut two pieces of " spruce plywood to 20" by
31". Cut the stiles and rails that frame these
panels, and glue and clamp them in place on the
plywood. As back-up for the glue, drive a few "
screws or finishing nails through the ply and into
the cedar.
2. The shakes filling the frames are actually cedar
construction shims adhered with hot glue. Starting
with a double layer at the bottom, test-fit the
shims, and trim to width with a straight edge and
utility knife. I left a gap, just eyeballed,
of about 1⁄8" between them. Once the pieces for the
bottom row are cut, glue permanently in place with a
couple of beads of hot glue, then repeat the process
four times, trimming to width (and length where
necessary) to make up the five rows of shakes,
spacing the rows 5 " apart. Be careful to off set
the shakes, so one vertical gap doesn’t line up with
the one below.
More pocket holes
1. The two panels attach to the front and rear
frames with more pocket screws. Drill four or five
evenly spaced holes down each side of the
panels--putting the holes on the plywood side, of
course. Apply a thin layer of outdoor-rated wood
glue down the edges of the side panel and then
secure it in place between the front and rear frames
with the pocket screws. Attach the centre panel the
same way, making sure it is centered on the stile.
2. Attach two more rails at the top and bottom of
the open end. Cut to length, drill two pocket holes
(from the back) per end, and secure between the
legs.
3. The rear panel is just a 31"-long piece of
plywood trimmed to fi t between the side and centre
panels (16 1⁄2" in my case, but measure first for a
perfect fit). It’s glued in place, secured with
pocket-hole screws from inside the cabinet, and then
the outside is covered in shims, applied the same
way as with the other panels.
Bottom and top
1. The cabinet floorboards are simply more ¾ " cedar
pieces, sitting on ¾ " by ¾ " cleats that are glued
and nailed to the bottom of the cart, ¾ " below the
top edge of the rails. The width and spacing of the
boards isn’t crucial here, so just use what you have
on hand and trim your boards to length. Evenly space
the slats and nail them to the cleats with 1¼ "
finishing nails.
2. The countertop base is ¾ " plywood, cut to the
exact dimensions of your tiles, then screwed in
place with #8 x 1½ " wood screws driven through the
top and into the frame of the cabinet. While I
really wanted the look of slate tiles, I chose to
use porcelain tiles for this surface instead.
Porcelain tiles are durable and far more uniform
than slate tile would be, but still have a look and
texture similar to natural stone. Because porcelain
tiles, unlike ceramic, are moisture-proof, they’re
not affected by freezing, though I wouldn’t leave
the work centre out all winter. Note: Don’t trust
the sizes on the tile box. Mine were listed as 12"
by 12", but they actually measured closer to 11¾ "
square. Lay out all of your tiles on an oversized
piece of plywood and trace the outside for an
accurate measurement.
3. To finish up the top, glue the tiles in place
with clear silicone caulking and edge the top with
some of the off cuts you set aside earlier. Trim
them to length and hold in place with wood glue and
1½ " finishing nails. It is a good idea to also
apply a small amount of silicone to the edges of the
tiles as you put them in place. By gluing the tiles
together like this, you’ll prevent water from
leaking into the small cracks between the tiles and
possibly harming the plywood substrate. The door The
door starts as three 30" lengths of 1x6, edge-glued
and sanded fl at. Choose the flattest, straightest
pieces you can find, and clean up the mating edges
with a pass on the table saw, or a few strokes of a
hand plane, to ensure a good fit between boards
before gluing. If desired, you can add two rails,
secured with screws to the back of the door, to
ensure it stays fl at. Once the door is built, trim
it to a final size of 15" by 28"and hang it with a
pair of brass or stainless steel standard cabinet
hinges.
Final touches
1. This is the fun part. Use the scraps and any
stuff you have lying around the cottage, along with
a healthy dose of imagination, to make up shelves,
holders, handles, and custom touches to suit your
needs. My handles and towel rods are made of old
copper pipe that I cleaned up with fine steel wool
and sealed with a coat of clear lacquer. I cut their
support brackets to a pleasing shape with a jig saw,
then drilled 3⁄8"-deep holes in them with a Forstner
or spade bit. The blocks, with pipe in position, are
glued and screwed in place. Two notes: Because the
right front leg sits proud of the stiles, its
bracket needs to be ¾ " shorter than the others.
Next, drill the holes 1⁄8" larger than the nominal
size of the pipe for a good fi t. For ½ " pipe, you
need a 5⁄8" hole; for ¾ " pipe, you need 7⁄8".
2. The shelf and rack inside my door can hold spice
bottles, a barbecue igniter, and various tools and
baskets. To make the rack, I used a 2" by 6¼ " piece
of scrap, into which I drilled three 7⁄8" holes and
then cut slots with a handsaw. The shelf consists of
two 3" by 3" blocks joined together with 6½ "
lengths of ½ " copper pipe, and two 1¼ " by 7 ¼ "
strips of ¼ " scrap nailed to the bottom. The parts
are then attached to the door with glue and, you
guessed it, pocket screws. Under the rack, I also
installed four solid brass hooks for added storage
options.
3. The middle shelf is made entirely of scrap left
over from cutting the 2"-wide stock earlier. Build a
frame with pieces standing on edge to fit inside the
opening, then attach the slats with a couple of
cleats and some finishing nails. You can attach the
shelf permanently with four 1½ " screws or, as I
did, use ¼ " brass shelf supports for it to rest on.
If the shelf is removable, just remember to make it
about 1⁄8" narrower than the gap, so you can get it
in and out easily. The bottom shelf is made in a
similar way, with slats resting on cleats.
Finish up and make it roll
1. The entire cabinet is finished with a mix of 50
per cent boiled linseed oil and 50 per cent naphtha
or mineral spirits. (I prefer naphtha as it dries
faster.) Brush on a heavy coat, allow it to soak in
for 20–30 minutes, and wipe off any excess with a
lint-free cloth. Allow the finish to cure for 24
hours, then repeat. Because this is a penetrating
finish, repairing any scratches or general wear is
as easy as applying another coat, letting it soak
into the damaged area for a few minutes, and then
wiping off any excess.
2. The final step is to add casters. While they are
completely optional, they make it much easier to
move the island around the deck. Because your
barbecue island will be exposed to weather, solid
brass casters are a good choice. The ones I used are
small in diameter; if you plan to move your cart
around a lot, or your deck boards are quite uneven,
you may want larger ones. To attach a caster, drill
a ¼" hole in the bottom of each leg, then insert the
caster’s stem and secure with the supplied brass
screws.
Flip your island back over and roll it to its place
of honor on the deck. Load it up with your grilling
essentials and start planning dinner. You will
appreciate the extra space, and your barbecue’s side
shelves can now serve a more noble purpose: holding
a cold beverage while you attend to the steaks.
|
Free
BBQ Cart Wood Plans
(Right Click on Image, and Select View as
Image or Save As to See the FULL SIZE
Picture)
|
|


