|
Give your canoes and
kayaks some VIP treatment. Get them off the dock and
into a custom storage stand.
A couple of rickety old sawhorses. That’s what
passes for a winter storage system for my canoe. And
during canoe season, I just park it upside down on
the beach. I didn’t invest a lot in that canoe—in
fact, I don’t even like it much—so I don’t lose
sleep over UV deterioration, or weather damage to
the thwarts, or even a limb falling on it.
Certainly, a better model— the kind that many
cottage folks have— should be better protected. It’s
the owners of those boats who have been asking us to
feature a storage-system project for canoes and
kayaks.
The design and engineering challenges for this
project were many. We wanted it to store four
individual crafts, whether canoes, kayaks,
sailboards, or even rowing shells. It should be
stable on sloped cottage waterfront, as well as
provide the boats a basic measure of security and a
roof for some protection from sun, weather, and tree
debris.
Before you build, give some thought to the sizes of
boats in your flotilla: You can easily modify the
overall length of the rack or the position of the
cross-arms to suit. Though this is not a complex
project—a couple of weekends’ worth of work—you will
need a part-time helper to assemble it.
|
MATERIALS
All wood is cedar, except the roof boards,
which are pine. Substituting pressure
treated lumber for cedar, where possible,
will reduce the project cost significantly.
1 3/4x6
x 6' ridge
board support
1 1x6 x
16' roof
cap
11 1x10 x 16'
roof boards
6 2x4 x
8'
rafter brackets, trestle filler blocks,
ridge board supports, bridge pieces
4
2x4 x 10' trestle
header, brace studs, struts
8
2x6 x 10' lower
trestle frame, rafters
2
2x6 x 12' cross-arms
2
2x6 x 14' feet
3
2x6 x 16' upper
trestle frame, ridge board
2
4x4 x 8'
(length may vary according to terrain): legs
1 4x4 x
10' diagonal
braces
HARDWARE
8
3/8" x 4"
galvanized carriage bolts, nuts, and washers
10 3/8" x 8"
galvanized carriage bolts, nuts, and washers
500 #10 x 3!/2"
deck screws (beige)
500 #8 x 3"
deck screws (beige)
500 #8 x 2"
deck screws (beige)
4
#/8" x 10 1/2" turnbuckles
(hook-and-eye type)
4
#/16"
anchor shackles
12 5/16" x 4"
eyebolts, 12 nuts, and 24 washers
1
6'-8'
chain
4
#/16"
quick links
8
threaded eyes
4
hasps |
|
 |
Leg assembly
1. Chances are your rack location isn’t level, so
your first step is to add extra height to the down
slope leg. Mark roughly where the two legs will go.
Sit a long, straight board on the ground, on edge:
one end at the upper leg mark, the other in line
with the lower mark. Lift the low end to level
(using a level, not an eyeball). Measure from the
ground to the bottom of the board at the low mark.
2. Cut the legs from the two 8'-long 4x4s —one 838"
long, the other that length plus the extra height
you just measured. Mark notches for the cross-arms
on the short leg and transfer the layout to the long
leg. The notches should be 15" deep by 55", but
check your 2x6s; their dimensions can vary. To cut
the notches, set your circular saw blade to cut 15"
deep, then make several passes to remove most of the
waste. Chisel out the rest and carefully smooth the
surfaces.
3. From two 14'- ong 2x6s, cut four 7' pieces for
the feet; with a jig saw, make the 15"-deep cut-outs
along the bottom.
Cut four 10" lengths of 4x4 for the filler blocks
(two from the leg off-cuts, two from the 10'-long
4x4). Drill a 5⁄16" hole through the middle of each
filler block for an eyebolt. Screw the feet to the
filler blocks with #10 x 35" screws and mitre the
top corners. In each filler block, install an
eyebolt and a nut (with a washer on each side of the
wood) and tighten. Slide each leg into the middle of
each foot assembly and clamp in place. Drill a 4"
hole through the foot assembly and the leg. Insert
an 8" carriage bolt, add a washer and nut, and hand
tighten.
Cross-arms and lower trestle frame
1. From the two pieces of 12'-long 2x6, cut four 6'
cross-arms. Each cross-arm has a curved bottom
taper—a detail that makes them look lighter and more
elegant. To mark smooth curves, all you need is a
thin, flexible strip of wood (a fishing rod works
too). Mark where you want the taper to begin and end
(leave the outside ends 35" wide). Holding the strip
against those marks, bend it to form a smooth curve.
If you don’t have a helper, a few finishing nails
will hold the strip in place while you mark. Cut and
sand the tapers and trim the top corners.
2. For the eyebolts in the cross-arms, you’ll need
to drill clearance holes, plus a countersink for the
nut. Drill a 1"-dia. hole 5" deep in the ends of
each cross arm and a 5⁄16" hole all the way through.
I had to cut about 5" off each eyebolt so it
wouldn’t protrude and scratch boats. If you put a
nut on the bolt before cutting, unscrewing the nut
will fix any threads that were damaged by your
hacksaw. 3. Square the cross-arms in the leg notches
and clamp in place. Drill two 4" holes in each;
install 4" x 4" galvanized carriage bolts, washers,
and nuts.
4. Miter the upper corners of the two 10'‑long 2x6s
for the lower trestle frame. A bit of juggling
follows. You and a helper must stand each leg
assembly (eyeballing that the leg is plumb) with the
bolt heads facing out, and clamp on one of the lower
trestle pieces. It must be tight to the lower
cross-arms and extend 6" beyond each leg. It will be
close to level because you already compensated for
the longer down slope leg, but minor shimming or
excavating may be needed to get it perfect. Plumb
the legs and screw on temporary braces. Screw the
lower trestle piece in place (positioning screws
where they won’t interfere with the bolts) so you
can remove the clamps. Add the other lower trestle
piece and bolt everything together with two 4" x 8"
carriage bolts per post; cut off the bolt ends and
file smooth.
Upper
trestle and ridge board
1. Trim three 16'-long 2x6s to 15'6" for the
upper trestle pieces and the ridge board.
Using two carriage bolts per leg, attach two
of these pieces as in the plans, 92" below
the tops of the legs. A 2x4 header
strengthens the upper trestle: Cut a
10'-long 2x4 to length (about 8'5") and
screw between the upper trestle pieces.
Screw a 2x4 trestle filler block—55"
long—between the upper trestle pieces, about
3" in from each end.
2. Mark the rafter positions on each side of
the ridge board: All (except the middle
rafter) are 24" on centre, starting in from
each end. Note that the top edge of each
rafter is 8" down from the top of the ridge
board. Centre the ridge board on top of the
legs and toenail in place. The ridge board
needs more support than just a few nails, so
I built a wood sandwich to hold it. The
“buns” are 2x4s, running along the legs from
the upper trestle frame to the top of the
rafters. The “lettuce and tomato” are made
of 5⁄4 deck board, filling the gap on either
side of the ridge board. Don’t forget to
match the rafter angle when you cut these
pieces. Screw the sandwich in place.
3. Mark the rafter bracket positions on
each upper trestle piece.
Bracing
1. The method I devised to give side-to-side
stability to the rack is pretty darned
clever! It adds rigidity to the structure
and adjusts for uneven ground. Attach each
turnbuckle (opened to about 8 of its total
length) to the lower cross-arm eyebolt,
using a 3⁄16" anchor shackle. Cut ieces of
chain to the distance between each
turnbuckle and the eyebolt below plus about
6". Fasten the chain to the eye with a 3⁄16"
quick link and hook the turnbuckle to the
chain. Check that the legs are still plumb.
Tighten each turnbuckle by hand only,
working each side a little at a time to
balance the tension. Remove the temporary
braces.
2. Cut the two 4x4 diagonal braces— 4' long
with 45° cuts at each end. I used a band saw
to cut decorative curves in the 4x4s, a
completely optional step. |
 |
From a
10'-long 2x4, cut two 55"-long brace studs. Slide
them in place between the trestle frames and tap to
make an impression of the cross-arm nuts. Remove the
brace studs and drill 1"-dia. pockets, about 6"
deep. Clamp them back in place; they should sit
tight against the legs. Position the braces and mark
where they meet the brace studs. Remove both pieces
once more and screw the braces to the brace studs
with eight #10 x 35" screws. Then screw these
assemblies to the legs and lower trestle.
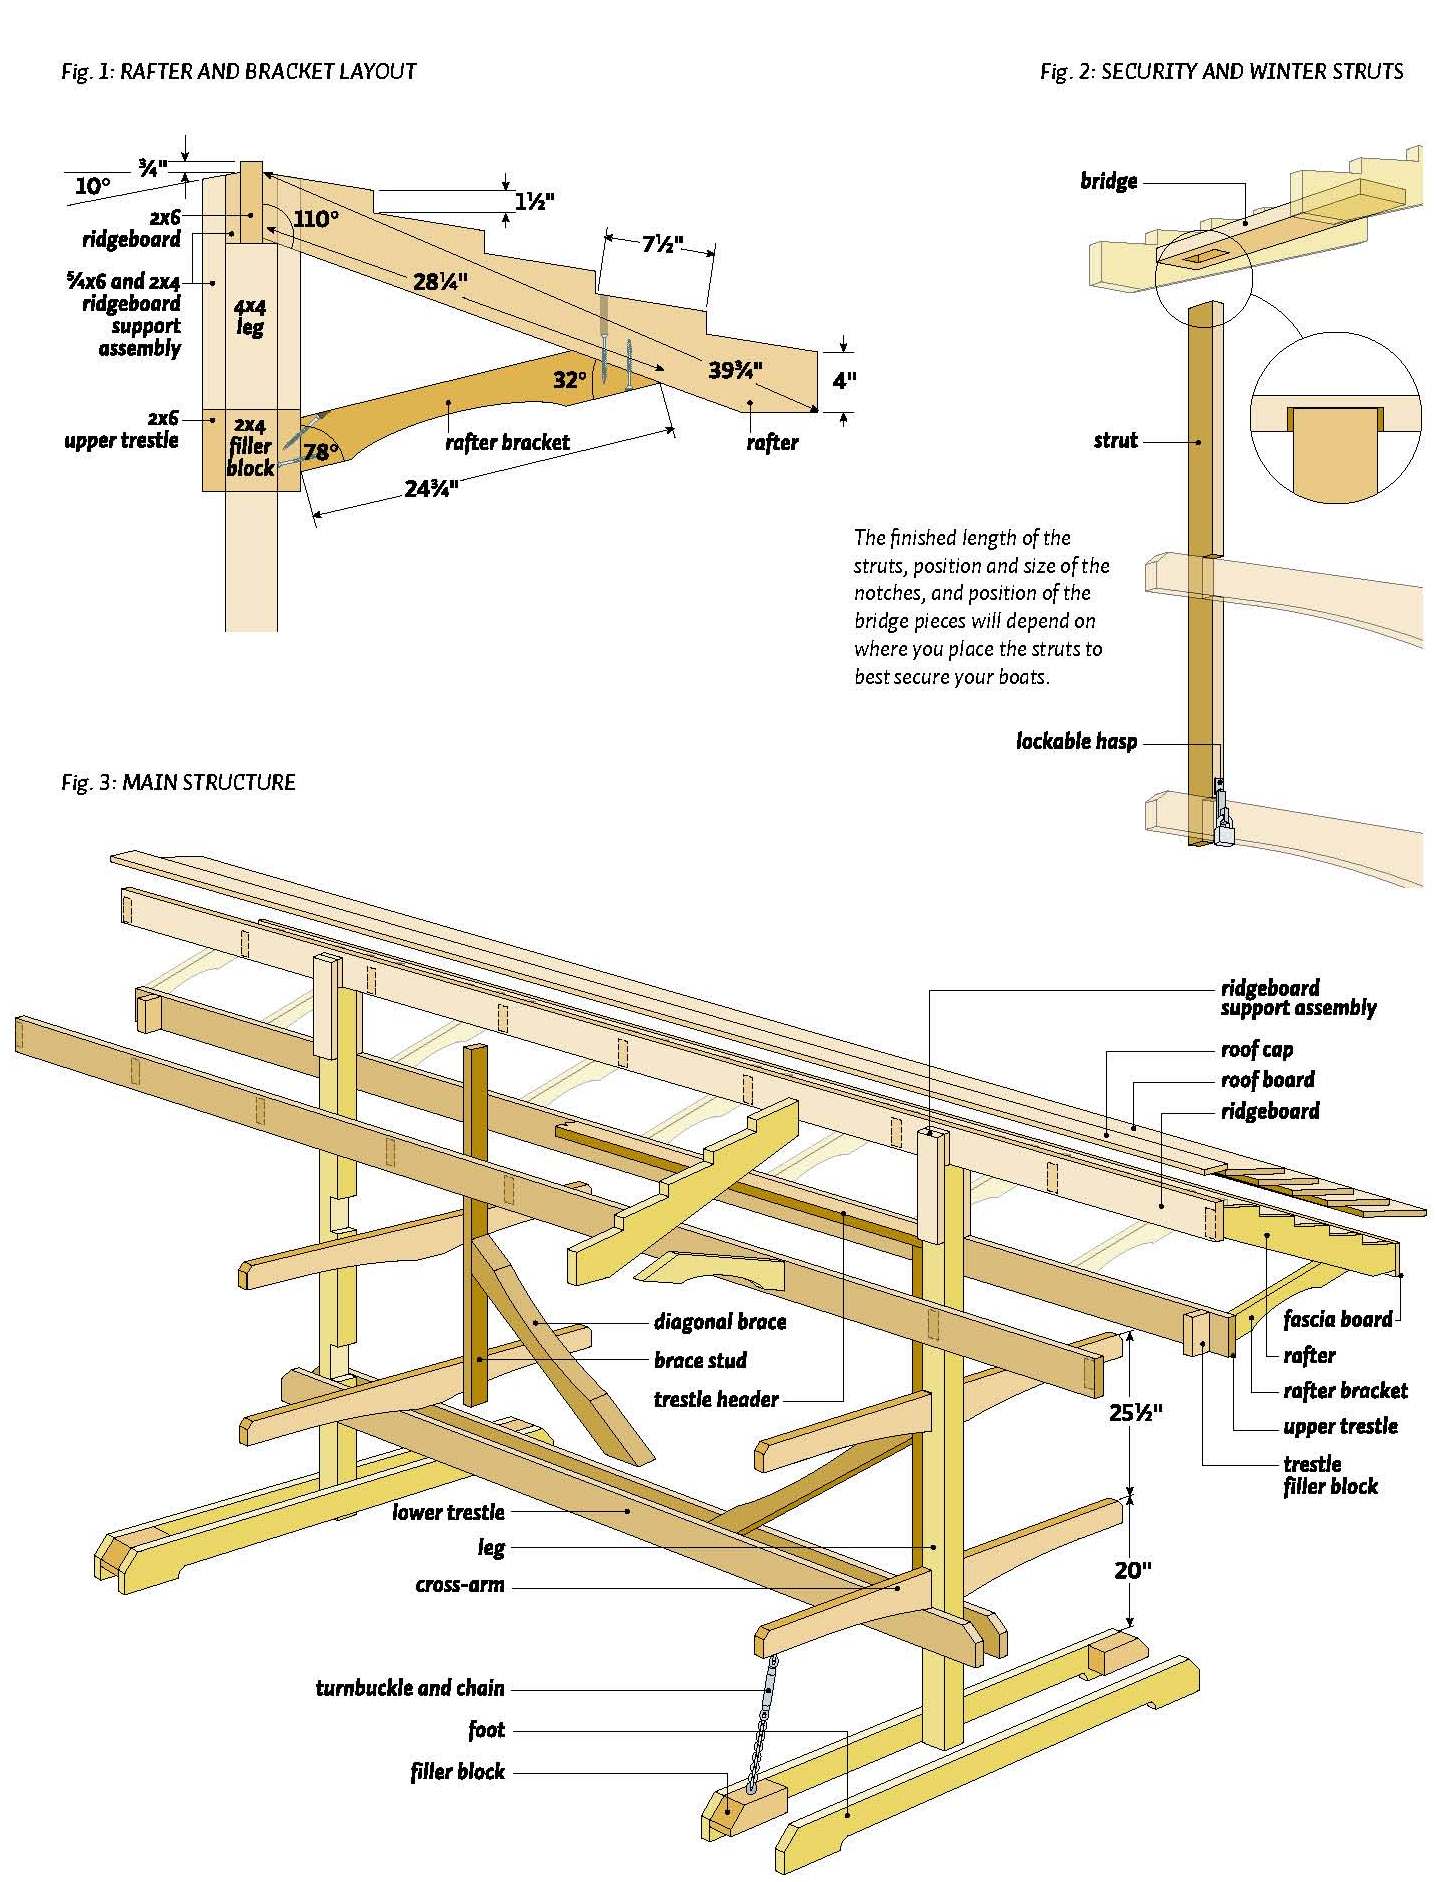
Rafters, rafter brackets, and roof
1. The rafters are cut from six 10' long 2x6s (three
per board), while the brackets are cut from four
8'-long 2x4s (lay these out carefully or you’ll need
more wood). While notching the rafters is
indeed tedious, it’s not just for style: The
louvered roof will reduce wind resistance.
Carefully mark and cut one rafter as a template for
the others (Fig 1). Mark where the rafter
brackets meet the bottoms of the rafters.
Mount the rafters on one side by screwing straight
through the face of the ridge board; secure the
other set by angling screws into them.
2. Before you start attaching the brackets
drill a clearance hole in each—about 3" in from the
end—to facilitate screwing to the rafters.
Secure the for end brackets to the for end rafters.
3. Rip the best 1x10 roof board down the center to
make two equal fascia boards. Trim to 15'6".
Mark the rafter positions on the top edge of each
fascia board. With your trusted assistant, attach
the fascia boards to the ends of the four bracketed
rafters using #8 x 2" screws; use a short
straightedge to drop the fascia just enough that the
roof boards will rest flush on top. Screw the
remaining rafters to the fascia and the ridge board,
and the rafter brackets to the rafters and the upper
trestle. I drilled a clearance hole down from the
top of each rafter for a second screw into the
bracket.
4. Trim the 1x10 roof boards and the 1x6 roof cap to
exactly 16'. Making sure the roof structure is more
or less square (it’s not a house, so don’t be a
perfectionist here), screw the boards on. Start with
the roof cap and work out from the peak. The roof
structure makes up a good 40 to 50 per cent of the
overall cost. If your canoe is like mine, accustomed
to neglect, you can omit the roof, but you should
still include the upper trestle pieces. They’ll only
need to be 10' long; lop off the top of the legs as
well, since you don’t need that height for the roof.
Security and winter-support struts
To handle snow load and provide a gesture of
security, my brother-in-law Tim and I came up with a
single solution for
both (see fig. 2). No, it won’t stop a determined
thief, but will prevent casual “borrowing” when
you’re not around.
1. Cut two 10' 2x4s to make four 5'-long struts.
With your boats on the rack, hold the struts against
the cross-arms, close to the boat hulls. Position
them so that removing your boats is impossible when
the struts are in place. Hold the top end of each
strut high enough that a bridge piece can secure it
(see Step 2, below), and mark notches in them to
mate with the cross-arms (the notches’ lengths will
vary). Cut the notches 15" deep.
2. Measure and cut a 2x4 to bridge the rafters over
each strut. Each bridge piece needs a pocket
cut into it to hold the top end of the strut. Clamp
struts to the cross-arms (plumb) and position the
bridge between the rafters. Mark where the
struts meet those pieces, then remove them and cut a
pocket (16" by 4" by 1"deep) for the struts. I used
a 16" Forstner bit, but a smaller auger bit and
chisel will work; likewise, you could use a router.
Screw the bridging pieces to the rafters (#10 x 35"
screws).
3. Attach a lockable hasp to the cross-arm and
strut as in the photo.
The little details
To hold the boats to the rack, we added threaded
eyes to the legs; bungee cords hooked into these and
the eyes at the ends of the cross-arms stop boats
from rattling around during a good nor'wester.
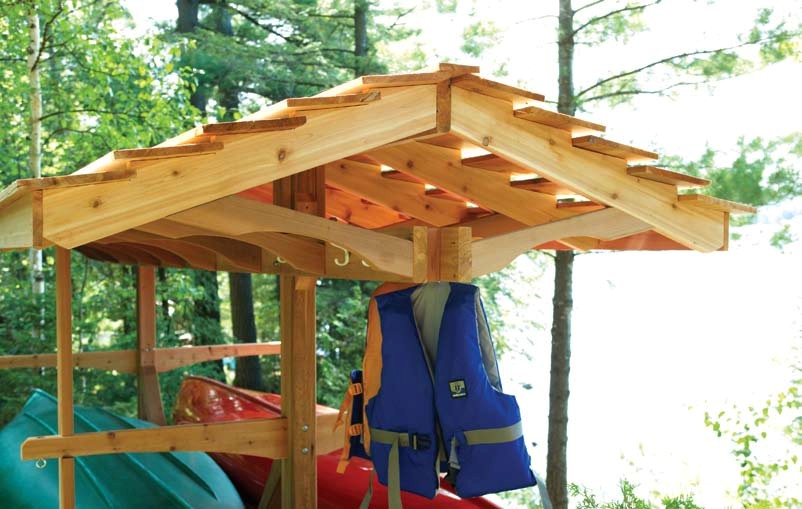
We screwed a few hooks to the upper trestle frame to
hang PFDs. You can also fashion a paddle rack to
hang your favorites—and the other ones you lend to
friends and relatives.
Finally, stain or paint the canoe rack if you
choose, but for my money, nature makes the best
finish job.
|
Free
Canoe Wood Boat Rack Plans
(Right Click on Image, and Select View as
Image or Save As to See the FULL SIZE
Picture)
|
|


