|
Do your kids want to
live it up? Here’s how to get your tree house
decked up with a new tree house tower.
BUILDING THE LOOKOUT TOWER
1] Start by cutting the four tower legs. You’ll need
to lay out a 11⁄2" x 3 1⁄2" notch on each of the
legs, 66" from the bottom, to accept the 2 x 4 side
joists that support the floor and anchor the tower
to the roof. I laid all four on edge and clamped
them together tightly to make cutting the notches
easier and more accurate. Set the depth of your
circular saw to 11⁄ ⁄2"; carefully make the two cuts
that define the notches and then make multiple
passes between them. Unclamp the 2 x 4s and
carefully chisel out the waste. Tip: Chisel out the
waste working up from each side of the 2 x 4 and
then chisel out the hump in the middle – this will
minimize chipping. Work diagonally across the cut.
2] The lookout tower is tied in to the third and
fourth rafters from the front (see Figure 2). On the
side fascia board, mark a centre line halfway
between these rafters. From points 12" on either
side of the centre, drop a plumb line down to the
deck. This marks the position of the outside edges
of the legs; draw layout lines on the deck, square
to the face of the
building and out to the deck edge. These lines
should be 24" apart. Secure two of the legs to the
deck floor and the handrail so that they are plumb.
I used 31⁄2", #10 deck screws, screwing up through
the deck boards into the base of the tower legs and
through the legs into the handrail. Remember that
the notches face in.
Materials
Lookout tower
MATERIAL
CUT TO
QTY
Legs
2 x 4
9'3"
4
Side joists
2 x 4
48"
2
Header joist
2 x 4
20"
1
Anchor board
2 x 8
17"
1
Backer board
2 x 4
161⁄2"
1
Side handrails
2 x 4
36"
2
Back rail
2 x 4
24"
1
Facing
1⁄2" plywood
22" x 36" 1
Owl cutout
1 x 8
1
Braces
2 x 4
32"
2
Ladder rungs
5⁄4 x 6
23⁄4" x 24" 6
Long nailing strips
2 x 2
21"
2
Short nailing strips
2 x 2
9"
2
Floorboards
5⁄4 x 6
20"
4
Trap door boards
5⁄4 x 6
191⁄2"
2
Battens
1 x 2
12"
2
Bridging piece
2 x 4
17"
1
Side and back panels
1 x 10
44"
8
Lookout tower hardware
QTY
2" deck screws
1⁄2 lb
21⁄2" deck screws
1⁄2 lb
31⁄2" deck screws
8
5⁄16" x 5" lag bolts
4
5⁄16" x 5" carriage bolts
2
5⁄16" washers
6
5⁄16" nuts
4
51⁄2" zinc-plated door pulls
2
4" strap hinges
2
11" x 16" Ensolite camping pad 1 |
|
Free
Tree House Tower Wood Plans
(Right Click on Image, and Select View as
Image or Save As to See the FULL SIZE
Picture)
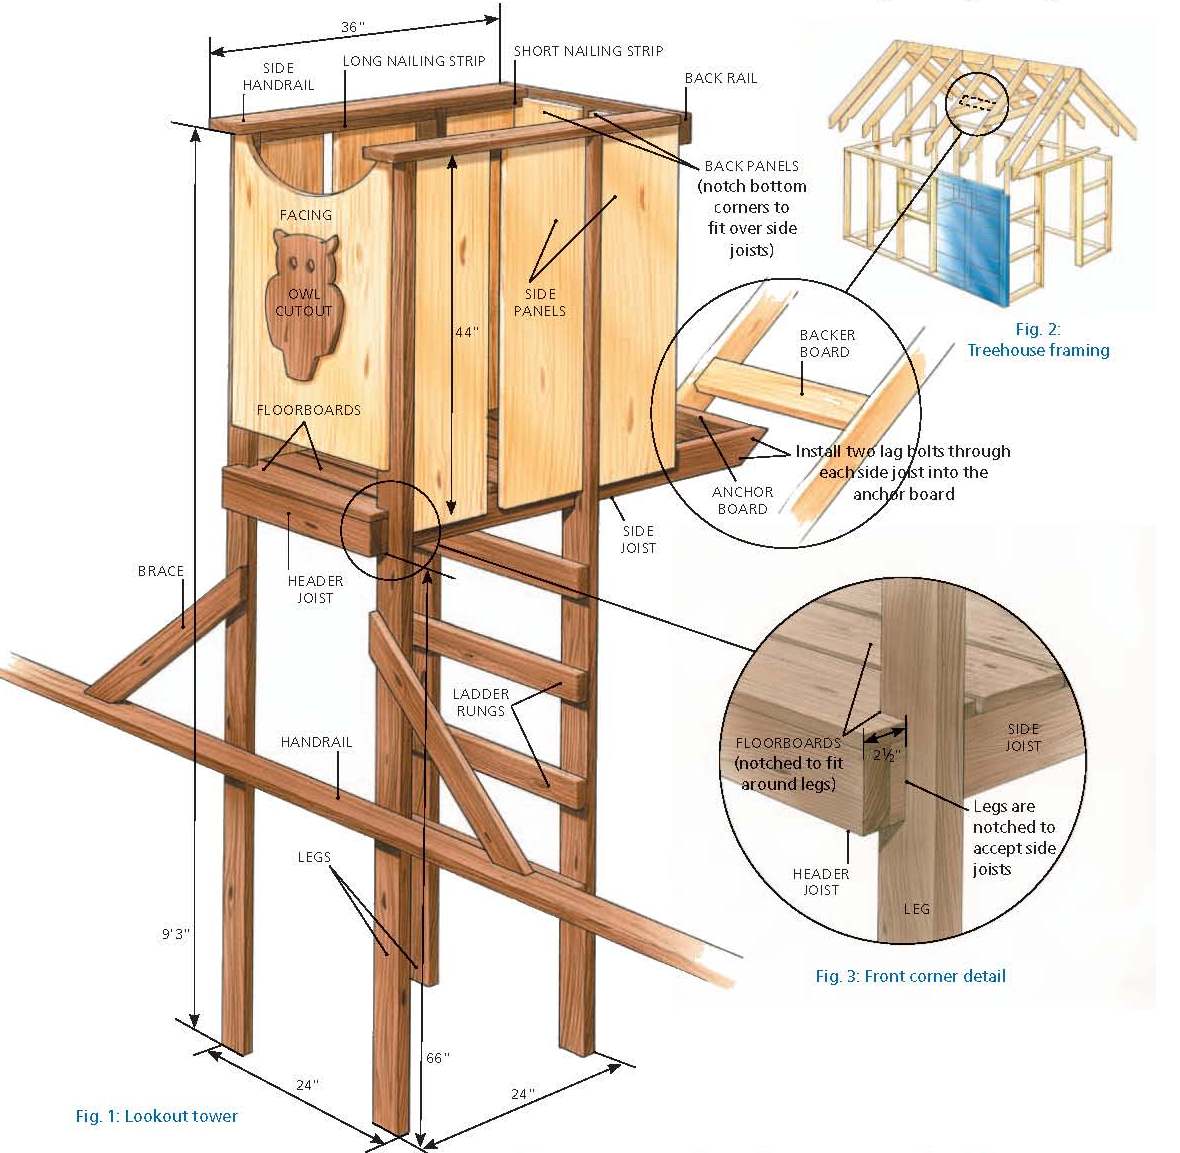 |
3] Make
the anchor board by ripping two edges off a piece of
2 x 8 at 45° (as in Figure 1) and cutting it to 17"
long. For the side joists, make a 45° cut across the
middle of an 8' 2 x 4, then cut each piece to an
overall length of 48". The anchor board sits on the
shingled roof, between these two joists. Set each
joist in the two tower legs and rest the mitered
ends on the shingles. Screw through both joists into
the anchor board; a single screw will do for now.
Position each joist so that it’s level and square to
the two tower legs. Fasten the anchor board to the
roof with two 2" screws, and the joists to the tower
legs. Stand the other two tower legs in place so the
joists sit in the notches and the legs are plumb and
24" (outside edge to outside edge) from the first
two. Screw the joists to the second set of tower
legs and the legs to the tree house deck.
4] Drill two 5⁄16" holes through the anchor board
and the roof. Cut a piece of 2 x 4 (not
pressure-treated) to fit between the rafters, inside
the building and opposite the anchor board. Using
the two holes you drilled to help position this
backer board, screw it to the rafters. Finish
drilling the 5⁄16" holes through the backer board.
Bolt with two 5⁄16" x 5" carriage bolts. To prevent
leaks, use a good quality clear caulking to seal the
anchor board and joist ends where they meet the
shingles. Drill two 5⁄16" holes through the end of
each joist and about 1⁄2" into the anchor board
(drill at a bit of an angle). Hammer four 5⁄16" x 5"
lag bolts, with washers, into the holes and tighten.
5] If you like, soften the front corners of the two
side rails by trimming them off with a 45° cut.
Screw them to the tops of the tower legs (the front
edges sit 21⁄2" proud of the front legs). Cut a
scallop in the top of the 1⁄2" plywood facing of the
tower (I used a garbage can lid to mark the curve).
Make the owl cutout – same size as for the tree
house door – from a scrap board and mount it on the
tower facing. Drill two 1" eyeholes through both owl
and facing. Attach the facing to the front of the
tower legs with 2" screws.
6] Cut the two diagonal braces and attach to the
deck handrails and the tower legs. Screw the tower
header joist to the ends of the side joists. Rip a
5⁄4" deck board in half and cut six 24" rungs; screw
the top one (with 21⁄2" deck screws) to the back
legs 91⁄2" below the top of the joists and the rest
spaced 101⁄2" apart. Cut two precut pressure-treated
balusters to make the nailing strips. Screw these
nailing strips to the underside of the side
handrails, flush to the inside edges – the longer
pieces between the two legs, and the shorter one
from the back leg to about 1⁄2" short of the end of
the handrail. (The back panels need to fit in this
gap, so check the short nailing strip before
securing and trim if needed.) Screw the back
handrail (turned on edge) to the ends of the side
handrails.
|
Free
Tree House Wood Plans
(Right Click on Image, and Select View as
Image or Save As to See the FULL SIZE
Picture)
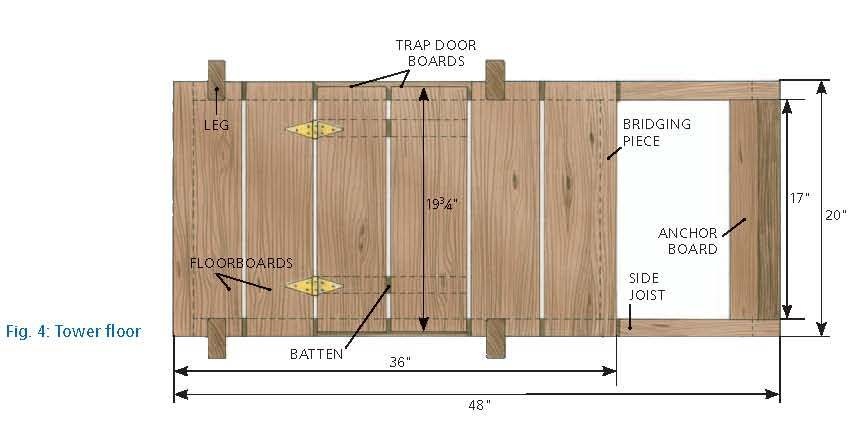 |
7] Now,
for the floorboards and trap door boards. Once
they’re cut to length, you’ll need to notch two of
the floorboards to accommodate the legs (see Figure
4). Screw or nail the floorboards to the joists
(drill clearance holes in the floorboards to prevent
splitting). Screw the two battens to the underside
of the two trap door boards and hinge (with 4" strap
hinges) to the fixed floorboard second from the
front (see Figure 4). Install a bridging piece
between the joists and flush with the edge of the
floorboard at the back. Add two handles to the
inside of the rear tower legs, about 2' up from the
tower floor, to make climbing easier.
8] Now to close in the sides with roof boards left
over from the tree house construction. You will have
to notch the two back panels to fit over the side
joists. Screw or nail these to the bridging piece
and to the inside of the back handrails. Attach the
side pieces to the side joists and the nailing
strips under the handrail.
9] Finally, I attached a piece of Ensolite – you
know, the cheap blue camping pads available at any
outdoor store – to the underside of the access door.
This will soften, a little at least, contact with a
kid’s head if the door is dropped accidentally (or
not so accidentally, depending on sibling
relationships).
|
 |
|


