|
Keeping
yard-and-garden equipment clean, organized and
accessible makes lawn care less of a chore. But
finding adequate storage in your garage (if you’re
lucky enough to have one) can be a challenge. My
husband and I knew a shed was the solution, so we
created a custom design that serves our purposes. To
avoid the need for a building permit, we made the
shed relatively small: less than 100 sq. ft. (Always
check with your local code authority for building
requirements in your area.) Its appearance mirrors
the look of our rural contemporary saltbox house,
and the clerestory windows above the door let in
plenty of light while leaving adequate wall space
for shelving and hanging equipment. The construction
is straightforward; here are the basic steps.
|
Free
Simple Shed Plans
(Right Click on Image, and Select View as
Image or Save As to See the FULL SIZE
Picture)
Free
Simple Shed Plans
(Right Click on Image, and Select View as
Image or Save As to See the FULL SIZE
Picture) |
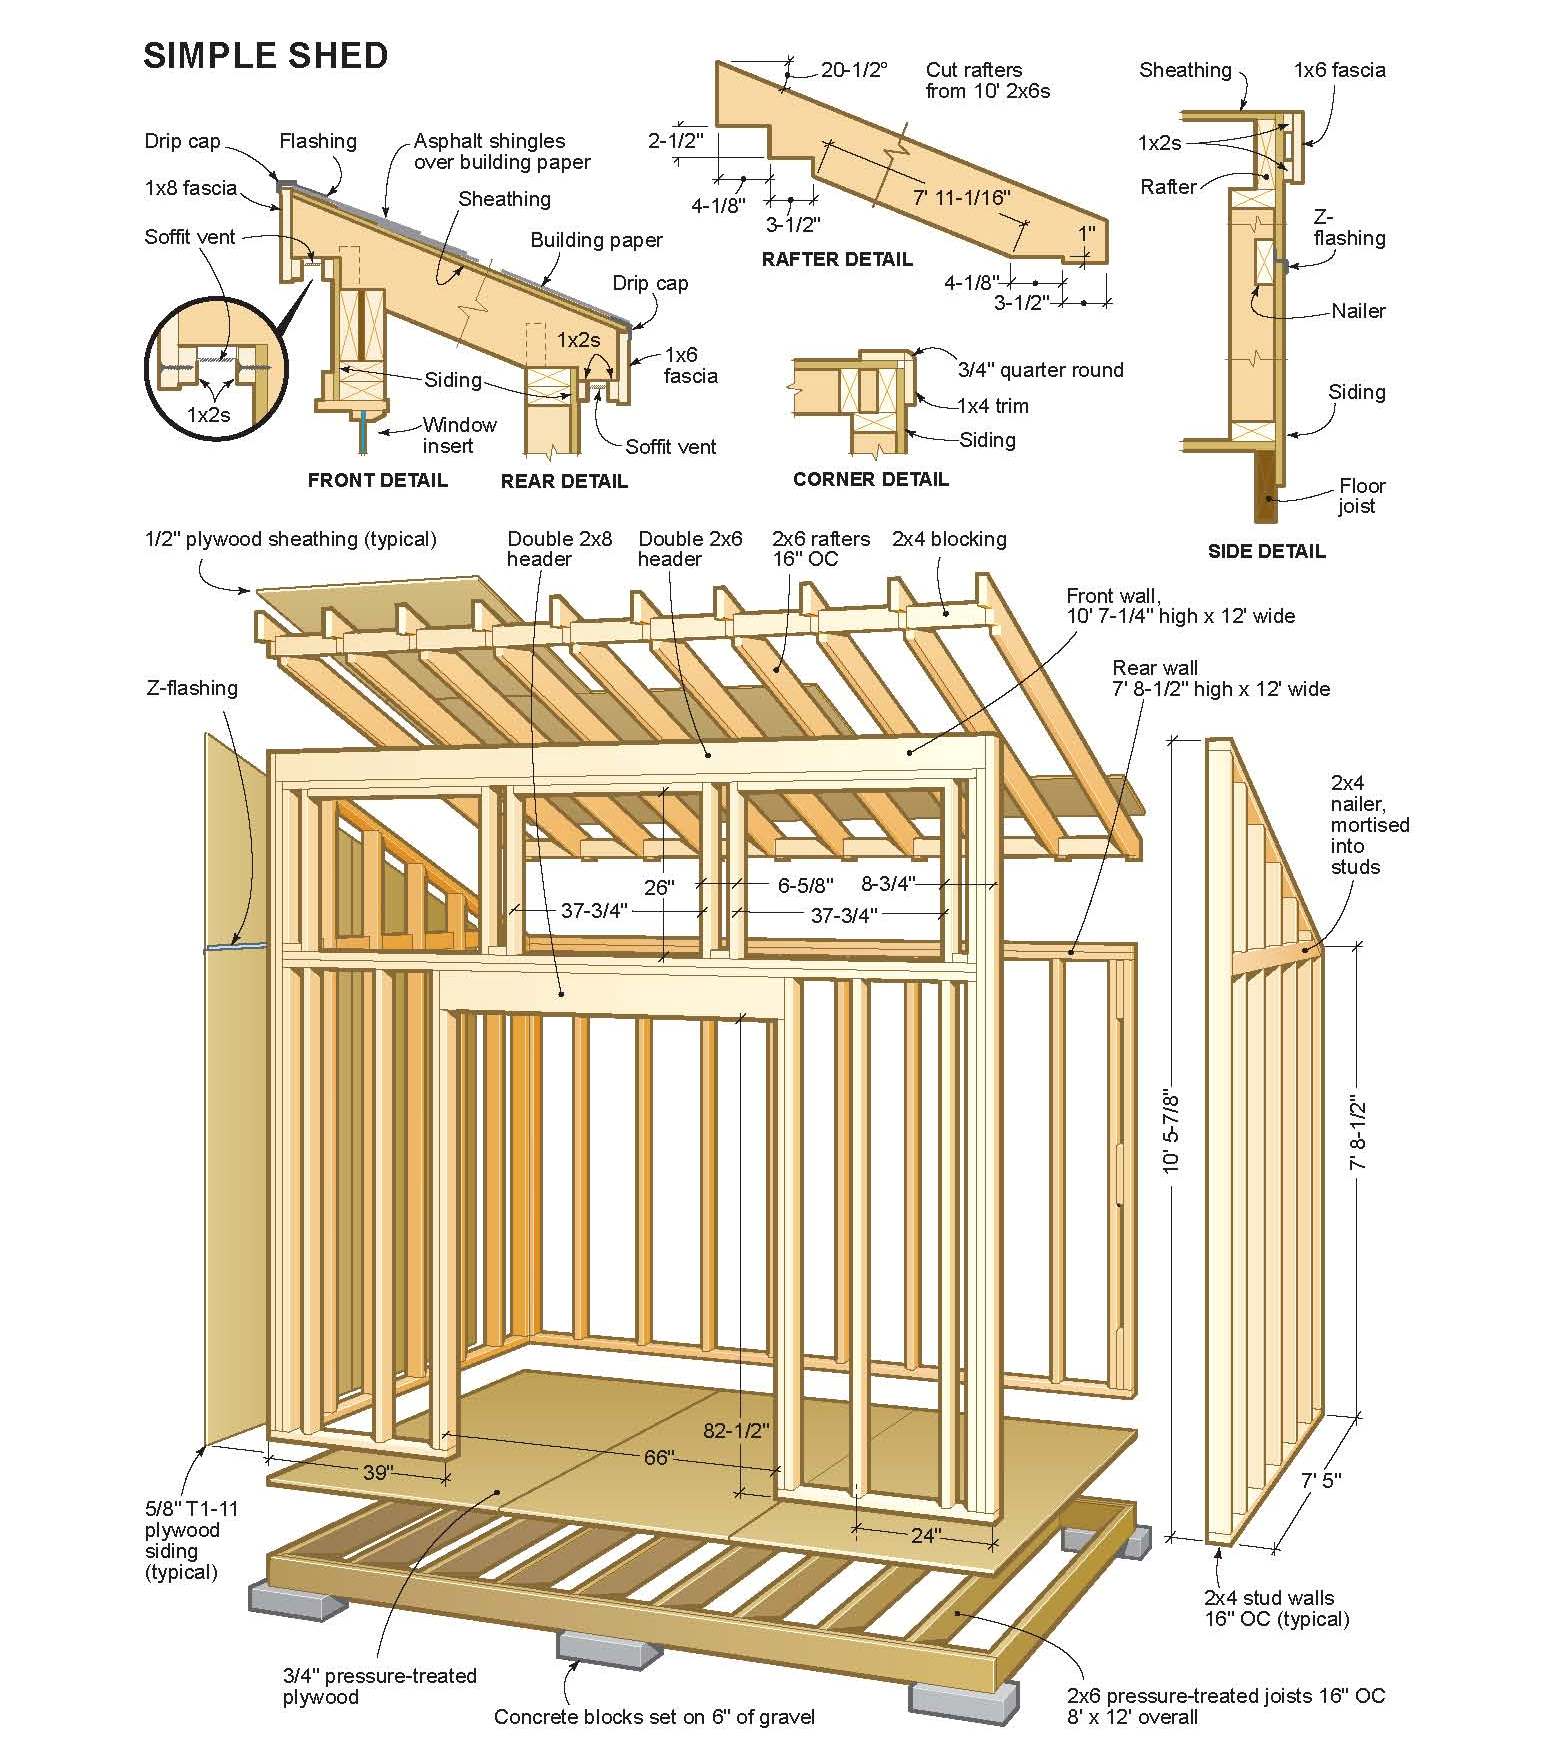
Foundation and floor
Start by laying out the perimeter. Drive 2x4 stakes
at each corner; then measure the layout diagonally
to ensure that it’s square. Dig 6-in.-deep holes for
8 x 12-in. concrete footing blocks. Fill the holes
with pea gravel, set the blocks in place and check
that they are level.
Use only pressure-treated lumber for the floor. Cut
the inside 2x6 headers 3 in. shorter than those on
the outside. Assemble the 2x6s so there is a
1-1/2-in. notch at each end of the header joist.
Mark the locations for the joist hangers 16 in. OC;
then install the hangers. Position the floor frame
on the foundation blocks and check that the assembly
is square and level. Cut the 2x6 joists and nail
them into the joist hangers. Fasten the 3/4-in.
pressure-treated plywood floor with 2-in. deck
screws.
Wall framing
You can use the shed floor as a surface on which to
build the walls before raising them into place. The
front wall is framed with 2x4 studs 16 in. OC and
has a double-2x6 window header and a double-2x8 door
header. Assemble the headers with 1/2-in. plywood
spacers. Cut a full-length sole plate (the door
opening is cut later), the top plates, the studs and
the window-cripple studs and blocking. To assemble
the front wall, nail the corner trimmers to the
corner studs. Mark the stud positions on the sole
plate and the first top plate. Working on the floor,
assemble the studs for the lower wall section.
Nail the second top plate to the first top plate;
then nail the end window cripples in place. Cut and
nail the short blocks to the top plate. Toenail the
cripple studs to the top plate with 8d nails; then
nail the 2x4 top plate to the cripple studs.
To install the top 2x6 header, nail up through the
plate with 10d nails and through the corner studs
with 16d nails. Nail the upper window blocking in
place.
Nail a long brace to the face of the front wall
diagonally to keep the wall square. Nail two short
2x4 blocks to the front of the floor to hold the
front wall in place and to keep it from slipping off
as you raise it. Fasten the sole plate to the floor
except along the door opening.
Refer to the drawing to lay out and assemble the
rear wall. Note that short blocks are used to form a
triple-2x4 end stud. Mark the stud positions on the
sole plate; then nail the studs in place. Fasten
both top plates.
As with the front and rear walls, cut and assemble
the side walls on the floor; then raise them into
position. Tack a 2x4 where the rear wall will be
placed, and build the side walls within the space
between the front wall and rear 2x4.
With a helper, raise the side walls into position
and clamp them to the front wall. Raise the rear
wall and clamp it to the side walls. Fasten the side
walls to the floor, the front wall and the rear
wall.
|

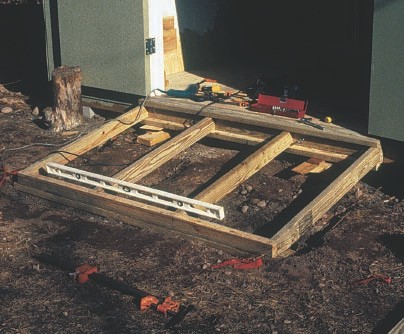
Prepare
the site; then build the floor frame and
position it on concrete blocks. Use only
pressure-treated lumber and galvanized
hangers and fasteners. |
|
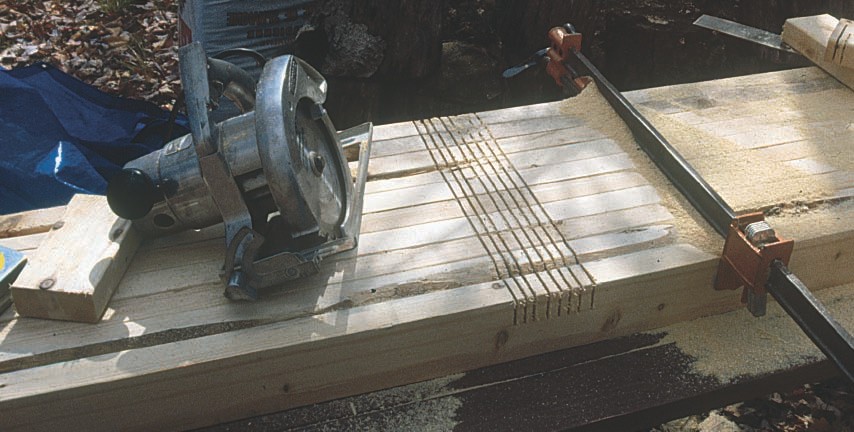
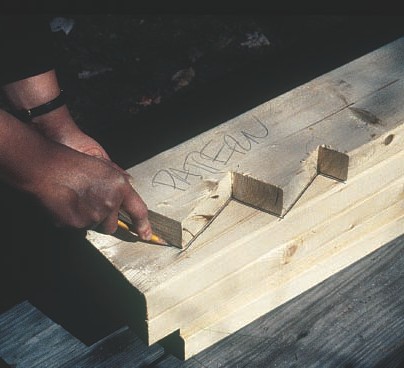
Notch the side-wall studs for the 2x4 nailer.
Clamp the studs together; then cut
1-1/2-in.- deep kerfs. Remove the waste with
a hammer and chisel. |
|
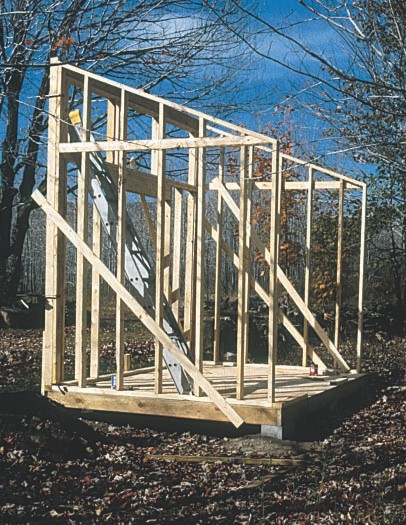
Erect the side
walls and brace them with 2x4s. Nail 2x4
spacers to the floor to establish the rear
wall position. |
Framing the roof
Because the rafters overhang the siding on the back
wall, you’ll need to install the siding before you
begin framing the roof. We installed the
5/8-in.-thick T1-11 siding with 8d galvanized nails.
The back requires three 4x8 sheets, nailed evenly at
the top of the wall. All of the siding overhangs the
floor 3-1/2 in.
Mark and cut one 2x6 rafter (see drawing, front and
rear details) and check the fit. Cut the remaining
rafters and toenail them in place with 8d nails. Cut
and install the 2x4 blocking at the front and back.
Attach metal rafter anchors to the rafters and to
the walls.
Install the remainder of the siding. The sides take
two full sheets with the top edges centered on the
2x4 nailer. Nail Z- lashing on top of these sheets;
then cut the angled top side pieces to fit. Remember
to cut and remove the sole plate at the door
opening.
Cut siding to fit between the windows and install
Z-flashing on top of them; then install siding over
to the header over the windows. Now you can cut the
door opening. Save the scrap pieces to make the
door.
|
To ensure
consistent cuts on the rafter ends, use the
first rafter you cut as a template. |
Fascia, vents and roofing
Sheath the roof with 1/2-in. plywood and fasten it
to the rafters with 6d ring shank nails. Nail two
spacers to the top of the side; then add the 1x6
fascia (see drawing, side detail). Tack the soffit
vents to the bottom of the rafter overhang. Nail or
screw 1x2s to the top of the wall and against the
vent.
Nail the fascia board to the rafter ends and install
the second 1x2 vent support. Clamp it to the fascia
tightly against the vent; then fasten it in place.
Nail a drip cap to the rear roof edge; then apply
15-pound roofing felt (full width), starting along
the bottom edge. Use 2-in. top laps for the
successive sheets. Install the drip cap over the
felt along the side edges of the roof; then install
shingles. To seal the roof peak, use 8-in. metal
flashing bent over the fascia; then add a drip cap.
|
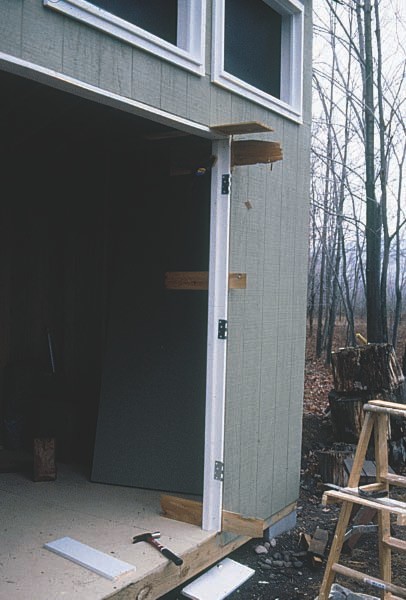
Shim the door
jamb with wood shingles when installing the
door.
A 2x4 ledger fastened to the shed’s floor
frame holds the back of the ramp. Rest the
front of the ramp on a 2x6 pressure treated
sleeper |
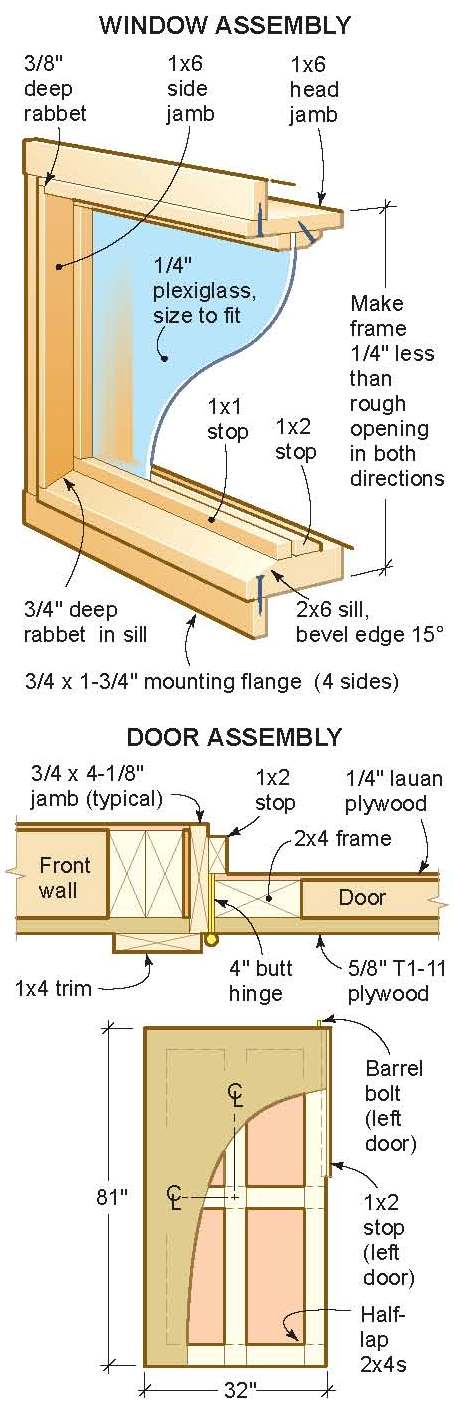
Windows
We made our own clerestory windows. The frames are
1/4 in. smaller than the rough openings. Cut the
jambs and sill to length. The sill has a 15-degree
bevel 2-3/4 in. along the front edge. Mark and cut
the 3/4-in.-deep rabbets at the sill ends for the
side jambs. Then cut 3/8-in.- deep rabbets in the
ends of the head jamb for the sides. Assemble the
frames with glue and nails. Cut 1x1 stops and nail
them in place. Install the mounting flanges; then
prime and paint.
We used 1/4-in. clear acrylic for the window
glazing. Bevel the back edges of the inside window
stops to make it easier to fasten them in place.
Prime and paint the stops; then insert the acrylic
and screw in the stops. Apply a bead of caulk along
the face of the siding and insert the windows; then
nail or screw the flanges to the framing.
Double doors
To build the doors, first rip the doorjambs from 1x6
stock. Cut 3/8 x 3/4-in. rabbets in the side jambs
for the top jamb. Nail the top jamb in place. Nail
stops 2-3/8 in. back from the front edge of the
jambs. Install 4-in. butt hinges on the side jambs.
Shim the door-frame assembly as required; then nail
it to the studs through the shims. Use a 4-ft. level
to keep the jambs plumb and flush with the face of
the siding. Nail the top jamb to the header through
the shims.
The double doors should have 1/4-in. clearance all
around. Make a door out of 2x4s laid flat and
half-lapped at the corners. Assemble the frame with
glue and 1-1/4-in. plywood on the front. Cut the
backs from 1/4-in. lauan plywood.
Install 1x4 door trim with a 1/8-in. reveal; then
hang the doors. Install a 1x2 stop along the inside
edge of the left door. Install a barrel bolt on the
left door and add a hasp on the outside.
Finishing touches
The ramp is framed with 2x4s and then covered with
2x4 decking attached with 3-in. deck screws.
Attach a 2x4 ledger to the floor header joist under
the door opening. Dig a 6-in.-deep area for the ramp
and fill it with pea gravel.
L-shape cane bolts are inserted into pipes on the
sides of the ramp to hold the doors open. We
installed 1x6 trim around the bottom of the shed to
protect the plywood siding from snow and added 1x4
corner boards with 3/4-in. quarter-round to finish
the corners.
Finally, we finished the shed’s exterior with
solid-color stain and white trim and primed and
painted the interior. The last step was to install
1/4- in. perforated hardboard and shelving to help
us make the most of our small yet sufficient
addition. |


 1911-1922, 140 old issues, DVD")


