|
Rise to the Occasion!
Jumping in the lake is easy enough, but heaving
yourself back out again can be a strenuous and
ungainly maneuver. Here’s a swim ladder for water
lovers that guarantees a swift and graceful exit.
Last year we constructed a new floating cedar dock
for the cottage; hardly a sensational event, but
significant nonetheless as the old one had been
built by my late father-in-law, Morley Abbott, some
20 years ago. Complete with an old-fashioned ramp,
it is a simple and functional dock, as such
structures go. Unfortunately, we gave very little
consideration to the swim ladder, that most
essential of accessories (all of us are well past
the age when we could lunge gracefully up onto the
dock). On a run into Parry Sound one day, I
purchased one made of plastic and metal, which we
installed that afternoon. It is certainly practical,
but frankly, it just doesn’t fit; unlike the dock,
the ladder is not pleasing to look at.
The fact is, I had not even considered a wooden
ladder until I saw some pictures of a swim ladder It
was built out of
Douglas fir salvaged from a boat dock. Besides
looking good, the ladder is inclined, a terrific
feature for the more mature cottager. No more
flopping around on the edge of the dock as you try
to pull yourself out of the lake; with this ladder,
you can ascend from the deeps with dignity and
grace.
Materials
2 pieces 2" x 8" x 7' cedar *
1 piece 2" x 4" x 7' cedar *
1 piece 2" x 6" x 7' cedar *
#9 x 3" outdoor screws
#9 x 2" outdoor screws
waterproof glue
1⁄4" x 3" lag screws
1⁄4" x 4" lag screws
2 2" L brackets
* (Specify “clear” or “select tight knot”) |
STEP 1.
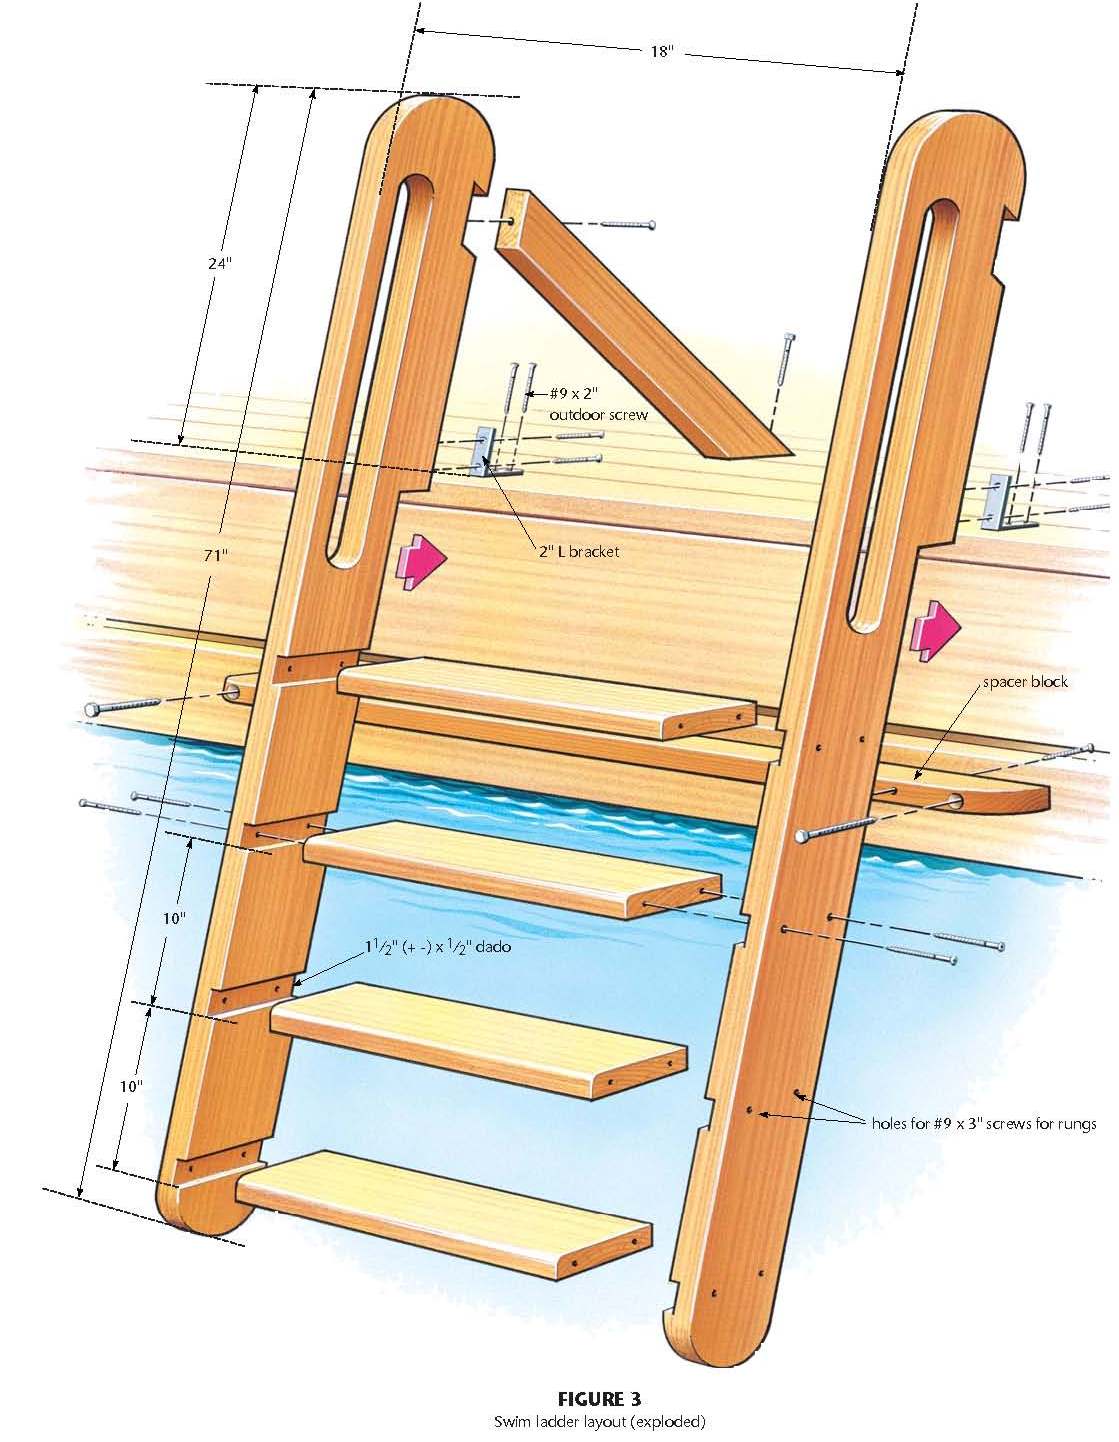
To begin, transfer the measurements for the ladder
rungs (Figures 3 and 5) onto the two pieces of 2" x
8" x 7'. (The legs only measure 71", but I used 7'
pieces to compensate for any end checking.) Pay
close attention to knots; you want to avoid any at
the top of the handle cutouts. Because the ladder
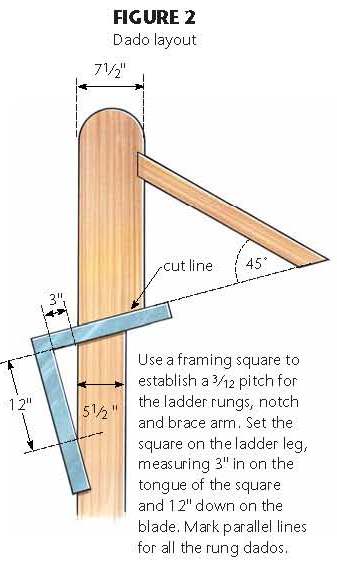
itself is designed with a 3⁄12 pitch to make getting
up and down easier, the rungs must be set on an
opposing 3⁄12 pitch so they’ll remain level (Figure
2). Remember to reverse the layout on one of the leg
pieces so that the dados the rungs fit into will be
on the inside of each leg, not on the inside of one
and the outside of the other. (Raise your hand if
you’ve never made that mistake!)
STEP 2.
Rip the bottom 47" of each leg to a width of 51⁄2".
This is easily done with a table saw, but a circular
saw and a guide will work just as well. (Remember to
stop short of the notch if you are using a table
saw.) Take out that trusty – not rusty – old handsaw
to finish off the rip cut and to cut the notch where
the ladder will rest on the dock (Figure 5). Clean
up the cut with a flat file.
STEP 3.
Cut a curve at the top of each leg. A friend of mine
has a band saw, so a few minutes spent in his
basement was worth the burger and beer I offered in
exchange. Obviously, not everyone has a friend with
a band saw, so you could try cutting the curves with
a jigsaw. However, as I’ve pointed out in previous
articles, despite the quality of the saw and/or the
blade, a less- han-perpendicular cut is often the
result when working in thicker material –
frustrating to say the least. As an alternative, you
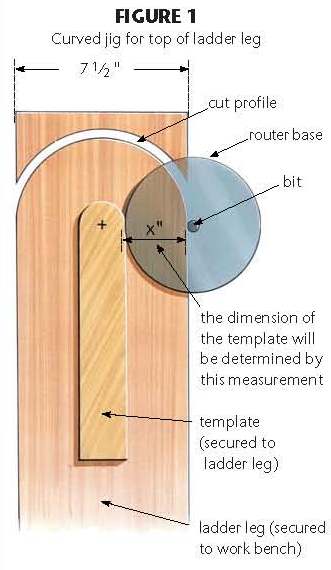
might want to try making a template fashioned out of
1⁄8" masonite or 1⁄4" plywood (Figure 1). Keep in
mind that the template provided is only a rough
guide; the actual width of your working template
will depend on the size of your router’s base.
Secure the template to the ladder leg, then use a
plunge router and a 1⁄4" or 1⁄2" straight bit to cut
the curve. Unfortunately, this method works best
only if you own or can borrow a router with a round
base, and it is difficult to find a 1 ⁄4" or 1⁄2"
bit long enough to cut all the way through 11 ⁄2"
lumber (on a previous project, a picnic table, I had
to finish the job with a jigsaw). This method does
have an advantage over the band saw, though: If the
bit is of good quality, the finish cut is generally
very smooth, so a lot less sanding is required.
STEP 4.
Drill 2" holes at A and B in each leg (Figure 5),
using a Forstner bit or a hole saw. Draw straight
lines to connect the holes in each leg to form
2"-wide slots. These will create the handles for
climbing up. Cut out the slots either with a jigsaw
or by using the router method described above (a
simple straight router guide will keep your cuts
parallel).
STEP 5.
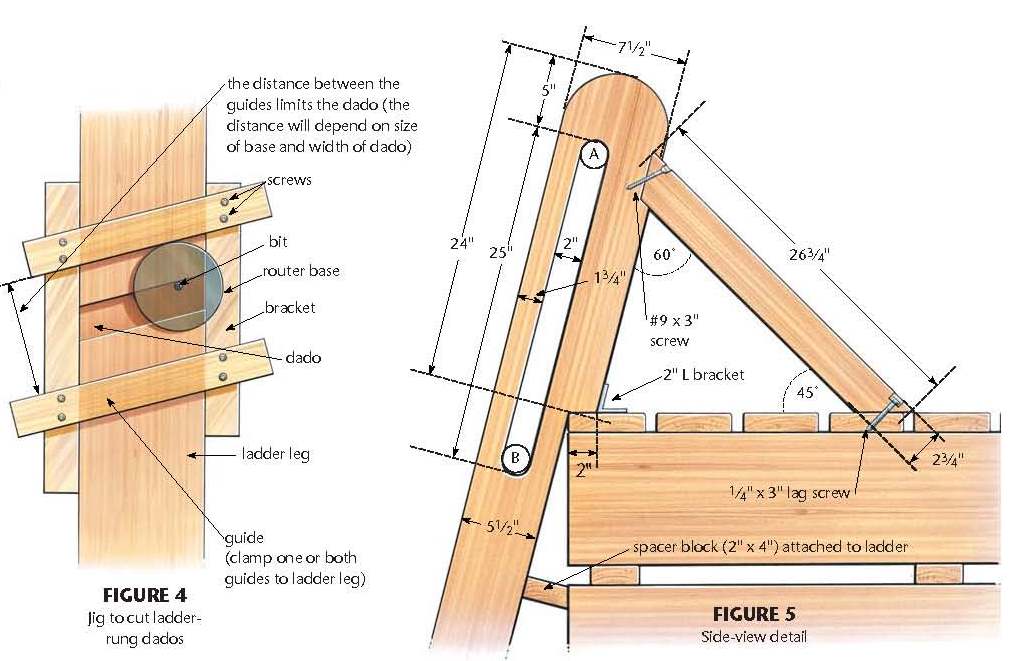
Before cutting the dados that the ladder rungs fit
into, check the leg layout one more time. Construct
the simple jig featured in Figure 4 from scrap wood.
The distance between the guides, as noted in the
diagram, depends on the size of the router base and
the width of the dado. In Figure 3, I have included
a plus or minus symbol in reference to the 11⁄2"
dado width. There is some variation in lumber
dimensions, so set the guide according to the
thickness of the material you’re using for the
rungs. Cut the dados to a depth of 1⁄2". A plunge
router makes cutting the dados an effortless task,
though an ordinary router will do the job, if more
slowly. (You will have to reassemble the guide to do
the other leg.) Drill 2 holes through each dado with
a #8 countersink bit for the #9 x 3" outdoor screws
that will be used to secure the rungs to the ladder
legs (Figure 3).
STEP 6.
At 31⁄2" wide, the braces that secure the ladder to
the dock looked too bulky, so I decided to cut the
2" x 4" pieces to length, then rip them to 23⁄4"
(Figures 3 and 5). A simple butt joint probably
would have done the job, but I chose a little
fancier, and perhaps more secure, union. The only
drawback is that the braces must be the exact length
(actually, a little longer wouldn’t be difficult to
correct, but a little shorter would cause
inappropriate language and hand-wringing). The brace
length indicated in Figure 5 should only be
considered an approximation; check your own dock for
an accurate measurement. Join a brace to each ladder
leg using waterproof wood glue and # 9 x 3" outdoor
screws. Do not drill the holes for the lag bolts
that will attach the other end of the brace to the
dock surface until you have the ladder in place on
your dock.
STEP 7.
From the piece of 2" x 6", cut the rungs to a length
of 19" (Figure 3). Round the front top edge of each
rung and the inside and outside edges of each ladder
leg, including the inside of the handrail slot using
a router and a 1⁄2" round over bit. Sand.
STEP 8.
Assemble the ladder, using waterproof glue and #9 x
3" outdoor crews to secure the rungs to the ladder
legs. Wipe off any excess glue.
STEP 9.
Cut the spacer block (Figures 3, 5, and 6) from the
remaining piece of 2" x 4". Drill and countersink
attachment holes as per Figure 6. The position of
the spacer block between the ladder and the face of
your dock will determine how wide it should be. It’s
a bit of a fiddle, but since floating docks come in
all shapes and sizes, the final size and position of
the spacer block must be custom fitted. The position
of the spacer block featured here corresponds to the
top of the flotation skirt on my dock.
STEP 10.
Give the ladder a final sanding and finish with
varnish or leave au natural. You might also consider
adding some type of tread strip to minimize
slipping, as we did. Bend the L brackets to match
the 3⁄12 pitch of the ladder, and attach them to the
ladder above the notch (Figures 3 and 5), using #9 x
2" outdoor screws. Attach the other end of the L
bracket to the dock surface the same way. Fasten the
braces to the dock surface with 1⁄4" x 3" lag
screws. Finally, secure the spacer block to the face
of the dock using 1⁄4" x 4" lag screws. This ladder
is a little heavier but far more attractive than the
metal or plastic versions. And the cedar should
guarantee it a relatively long life
|
Free
Wood Swimming Ladder Plans
(Right Click on Image, and Select View as
Image or Save As to See the FULL SIZE
Picture)


 |
|


