|
To me,
swimming has always seemed a rather pointless
pastime. Frankly, I need to be going somewhere. I
mean, when I get on my mountain bike and head out
from the cottage, I’m either bound for Ardbeg on
Hwy. 520, or Wolf Lake via the old snowmobile trail.
When I strap on the skis, I’ll likely end up at
Maple Lake. But when I get in the water, there is no
place to go; I can barely make it to Uncle Rob’s
dock, let alone Miller’s Point, so I’m left
aimlessly paddling around. To an
obsessive/compulsive guy like me, it seems rather
immoral to simply wander around without somewhere to
go. If I am just going to paddle around 15 or 20
yards from the dock, then I might as well get out
and haul gravel. Truly, I envy people like my wife,
who effortlessly glides through the water and cares
not for destination. For her – and those of you like
her – strange as it might seem to my kind, the act
of swimming itself appears to have an inherent
reward.
However, I’ve considered that a swim raft could be
the answer to my needs as a swimmer of limited
ability and a man who likes to have a destination.
If I had a swim raft anchored out from shore, I
could stroll down to the dock, secure in the
knowledge that I was headed somewhere once I hit the
water. But it is one of those projects I simply
never got around to doing. (Rebuilding the driveway
or finishing the ceilings seem to push into my
time-space continuum.) I finally decided that
a swim raft is a great place for kids to play, or
adults to soak up the sun, so here we go.
|
Free
Swim Raft Wood Plans
(Right Click on Image, and Select View as
Image or Save As to See the FULL SIZE
Picture)
Free
Swim Raft Wood Plans
(Right Click on Image, and Select View as
Image or Save As to See the FULL SIZE
Picture)

Free
Swim Raft Wood Plans
(Right Click on Image, and Select View as
Image or Save As to See the FULL SIZE
Picture) |
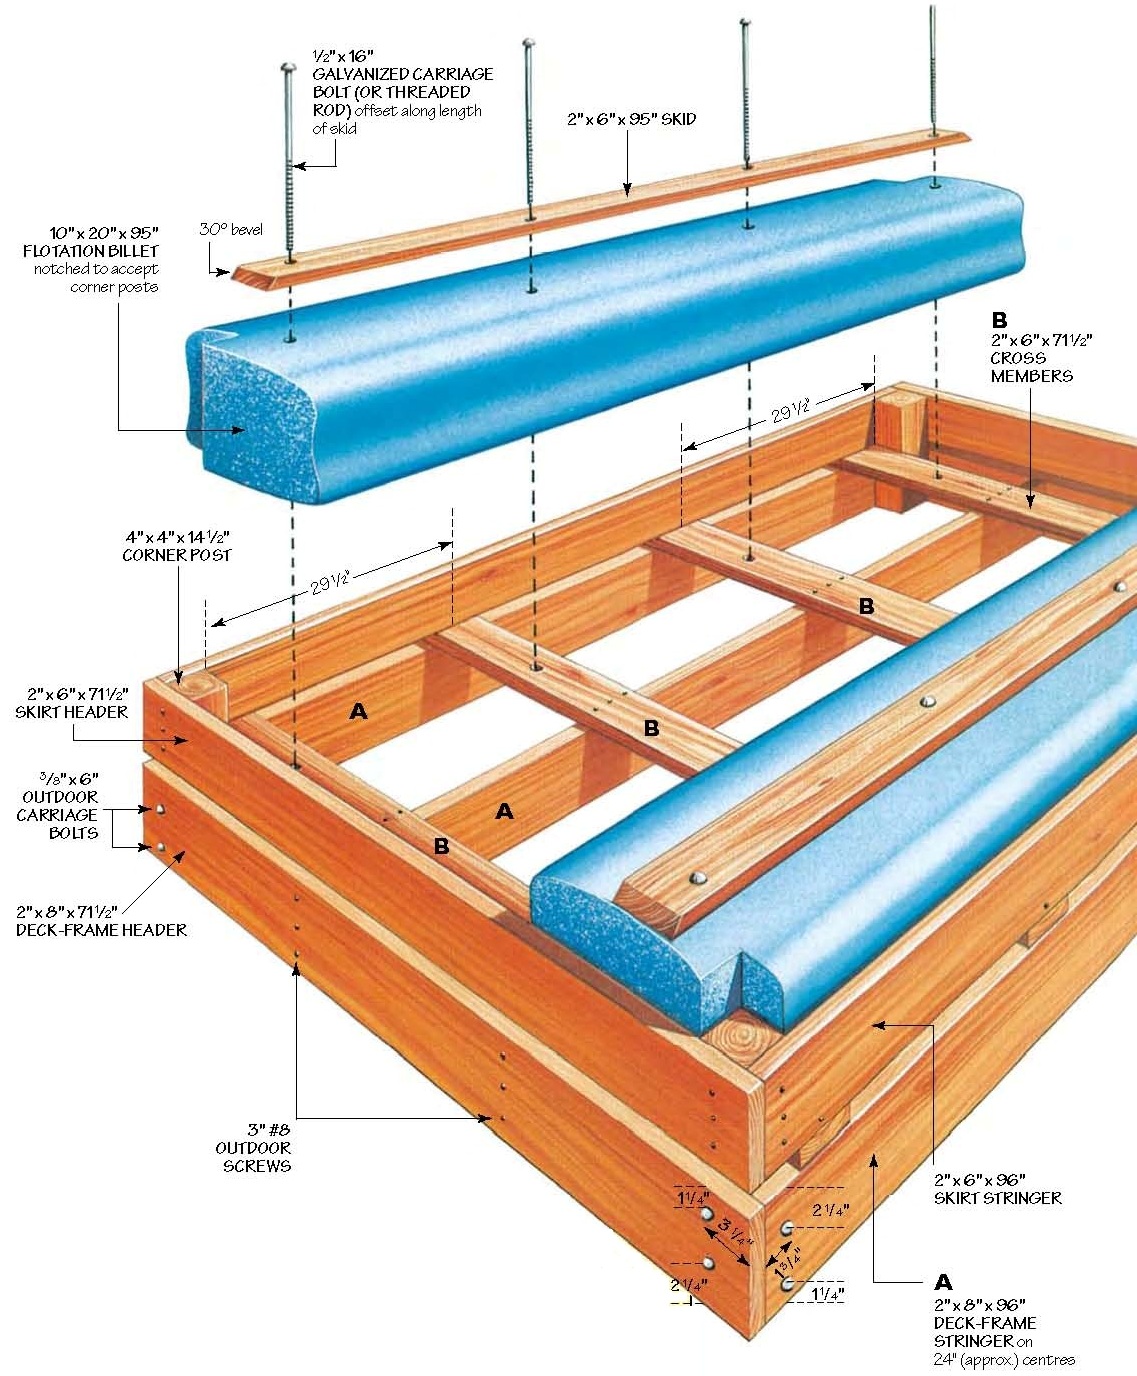
Materials
1 -- 4" x 4" x 6' (corner posts)
4 -- 2" x 8" x 8' (deck-frame stringers)
2 -- 2" x 8" x 6' (deck-frame headers)
4 -- 2" x 6" x 6' (cross members)
2 -- 2" x 6" x 8' (skirt stringers)
2 -- 2" x 6" x 6' (skirt headers)
2 -- 2" x 6" x 8' (skids)
1 -- 2" x 4" x 14' (ladder)
9 -- 5⁄4" x 6" x 12' rounded-edge decking
2 -- 10" x 20" x 8' Styrofoam flotationbillets
5 lbs -- 3" #8 outdoor screws
16 -- 3⁄8" x 6" outdoor carriage bolts,washers, and
nuts
8 -- 1⁄2" x 16" galvanized carriage bolts, washers,
and nuts
1 -- heavy-duty galvanized eyebolt,washer, and nut
We decided that 6' x 8' would be an ideal size
for a swimming raft. (At this size, it might not be
as stable as, say, a floating dock, but isn’t
tippiness an admirable design feature for those
king-of-the-raft battles?) The raft was built with
Western red cedar framing and decking, and put
together with rust-proof hardware, and green outdoor
“deck” screws instead of nails. All holes were
predrilled. For flotation, we used Dow Styrofoam
Buoyancy Billets, which were through-bolted to the
raft’s frame. To keep costs down, we didn’t wrap the
billets in black polyethylene sheeting and
galvanized hardware cloth, as is usually recommended
to protect them from critter damage; and we eschewed
the heavy-duty galvanized hardware that the best
floating docks are built with. After all, this is a
swimming raft, not a parking spot for some mahogany
classic. This project is fairly straightforward –
suitable for a beginner or intermediate DIYer – and
shouldn’t take more than 6–8 hours to complete.
— For this project, 75% of the assembly is completed
with the raft upside down. Begin by cutting the 4" x
4" corner posts and the 2" x 8" stringers and
headers. If you’re a careful reader, you’re probably
asking yourself why the headers are 71-1⁄2" instead
of 72" long. (See materials list.) Originally, I had
cut them to 72", but then discovered that the 5⁄4" x
6" rounded-edge deck material that I had ordered in
12' lengths was exactly that: 144". Nothing to spare
for trimming and saw kerf. So I had to go back and
cut the headers 1⁄2" shorter to compensate. (The
5⁄4" rounded-edge decking was chosen because it’s
more than adequately strong for our raft, and it
sure looks a lot better than 2" x 6"s.)
To facilitate drilling and assembly I secured each
corner post, in turn, to a stringer with a short bar
clamp; I then repeated the procedure for the
headers. (If you don’t have bar clamps, you could
always screw the frame members together at the
corners and then attach the posts.) Attach the
corner posts to the stringers and headers with the
3⁄8" x 6" carriage bolts.
— Cut four 2" x 6" cross members to a length of
71-1⁄2". (The flotation billets are bolted to the
cross members.) At this point, check the deck-frame
structure for square; the length of the diagonals
should be equal. Screw the cross members to the
deck-frame stringers. When locating the screws at
the end of the cross members, do not measure in 3⁄4"
(to the dead center of the stringer). Instead, mea
sure in 11⁄4" and angle the screws slightly out.
This avoids splitting the ends of the boards.
— Next, cut the 2" x 6" skirt stringers to length
and attach them to the corner posts. (The skirt
stringers should rest on the cross members.)
Cut the 2" x 6" skirt headers to length (they should
be 71-1⁄2", but expect some minor variations) and
attach them to the corner posts. Next, drive screws
on an angle down through the outside of the skirt
stringer and into each cross member. The purpose of
the skirt is to protect the flotation billets from
damage. I trimmed the billets with a handsaw to 95",
leaving a 1⁄2" gap at either end, and notched them
to accept the corner posts.
— Trim the 2" x 6" skids to a length of 95" with a
30° bevel at each end. The skids secure the billets
to the cross members, protect the flotation, and
make it easier to pull the raft out of the water for
winter.
Once the billets and skids are positioned, you can
simplify drilling and bolting them by using a couple
of long bar clamps. I placed two 6' 2" x 4"s across
the skids above the two centre cross members and
then used the clamps to squeeze the skids down onto
the billets and to hold everything in place. At each
end of both skids, drill a 1⁄2" hole down through
the skid, the billet, and the cross member. (An
extension rod for the drill bit is necessary for
this task.) Note that the holes are offset along the
length of the skids. (See diagram.) Tap four 1⁄2" x
16" galvanized carriage bolts down through the
holes, add washers and nuts, and bolt tight. (This
is not a fun job, as the space is very tight.) By
the way, these large bolts can be difficult to find
in your local hardware store.
Remove the bar clamps and 2" x 4"s, drill the four
remaining holes, slide the bolts into the holes, and
add the washers and nuts. (No need to tighten, as
you can do this when the raft is inverted.) While
the raft is still upside down, add a galvanized
eyebolt to one of the cross members to provide an
anchor attachment.
— Now it’s time to flip the raft over. Forget the
macho stuff and call in a helper or two. Then
tighten up the four remaining 1⁄2" bolts. Trim (and
I mean slightly) the ends of the 5⁄4" x 6" x 12'
decking and cut to length. Predrill with a
countersinking bit, and screw the deck boards to the
deck frame assembly using the ever-popular 3" #8
outdoor screws, angling them outward as with the
cross members. Leave a 1⁄2" gap between the boards.
If they are warped (when aren’t they warped?), that
long bar clamp can come in handy to pull those
naughty twisted ones into place while you get the
screws in. Seventeen boards were required to deck
the raft, which leaves one extra (in all likelihood,
you will have at least one reject, so it’ll balance
out), and the last one had to be ripped to fit.
Remember to check the distance from the deck boards
to the end of the raft as you near the end, and
adjust the spacing accordingly.
— Complete the raft by sanding the deck and any
sharp edges or corners. Finally, for the older folk
(such as myself ), I added a ladder.
All that remains is to make sure your swim raft is
securely anchored in some suitable location where it
won’t be a hazard to navigation. Then just add sun
and swimsuit, and enjoy.
|

|
|


